OKOKOK - or maybe the very worst ;-) ... All depends on your preferences and from which perspective you look at it ! I just prefer to spend as little time behind a computer screen as possible & rather'd go out take some PIX ! ... Like this one, i found in Buitrago del Lozoya, Spain where there's a great Pablo Picasso Museum: Go on and take a look, if you get a chance, you sure ain't gonna regret it !
Anyway - in this Blog i'd like to share my X-Trans workflow. Yeah I know this kinda topic has been beaten to death elsewhere, but after reading 'em all i developed my own "simplified" workflow & hope it's of some interest to you X-Trans fans out there !
So, before X-Trans life was easy: import images, move some sliders around, DONE ! Then along came Fuji with their ab-so-lute-ly AWESOME APS-C X-Trans sensor - and nothing worked no more ! Even Adobe's latest re-incarnation of Lightroom 5.7 still don't cut it for me: The converted RAW files still often demonstrate the dreaded "smearing effect" on green foliage and other small details ...
After some research i stumbled over Picture Code's Photo Ninja with a nifty solution to integrate their RAW converter into a Lightroom workflow ! Here's how it works best for me:
- Import images (RAW+JPEG seperated) into date stamped folders on my laptop
- Sort, rate & add copyright info using Camera Bit's Photo Mechanic software
- Copy images selected for processing into Lightroom auto import folder, see here how to set that up ...
Sort, Rate and add © in Photo Mechanic ...
- Open Lightroom & your copied images will magically import & appear:
Open Lightroom & see your auto-imported images !
- From the Develop module export your selected image to Photo Ninja. if you've set up Lightroom & Photo Ninja as indicated here, this will make Photo Ninja open the original RAW file with the same file name, see below:
Original X-Trans RAW file opened in Photo Ninja !
- In Photo Ninja I just make sure that I get a "digital negative" with maximum dynamic range to have the best starting point for later post processing - normally it's all about recovering highlights (and Fuji X-Trans files have a lot of highlight headroom !). See these great Photo Ninja tutorials to learn more !
- I then hit "save", which makes Photo Ninja overwrite the TIF file in Lightroom:
Photo Ninja overwrites the TIF file in Lightroom !
- This TIF from Photo Ninja exhibits wonderful details rendering & now includes an amazing dynamic range - ideal as a starting point for my subsequent post processing in Lightroom !
- My first step back in Lightroom is to render the image to Black & White in the Develop module's "Basic" tab (but you can also skip this if you prefer color):
First step in Lightroom is to change over to Black & White ...
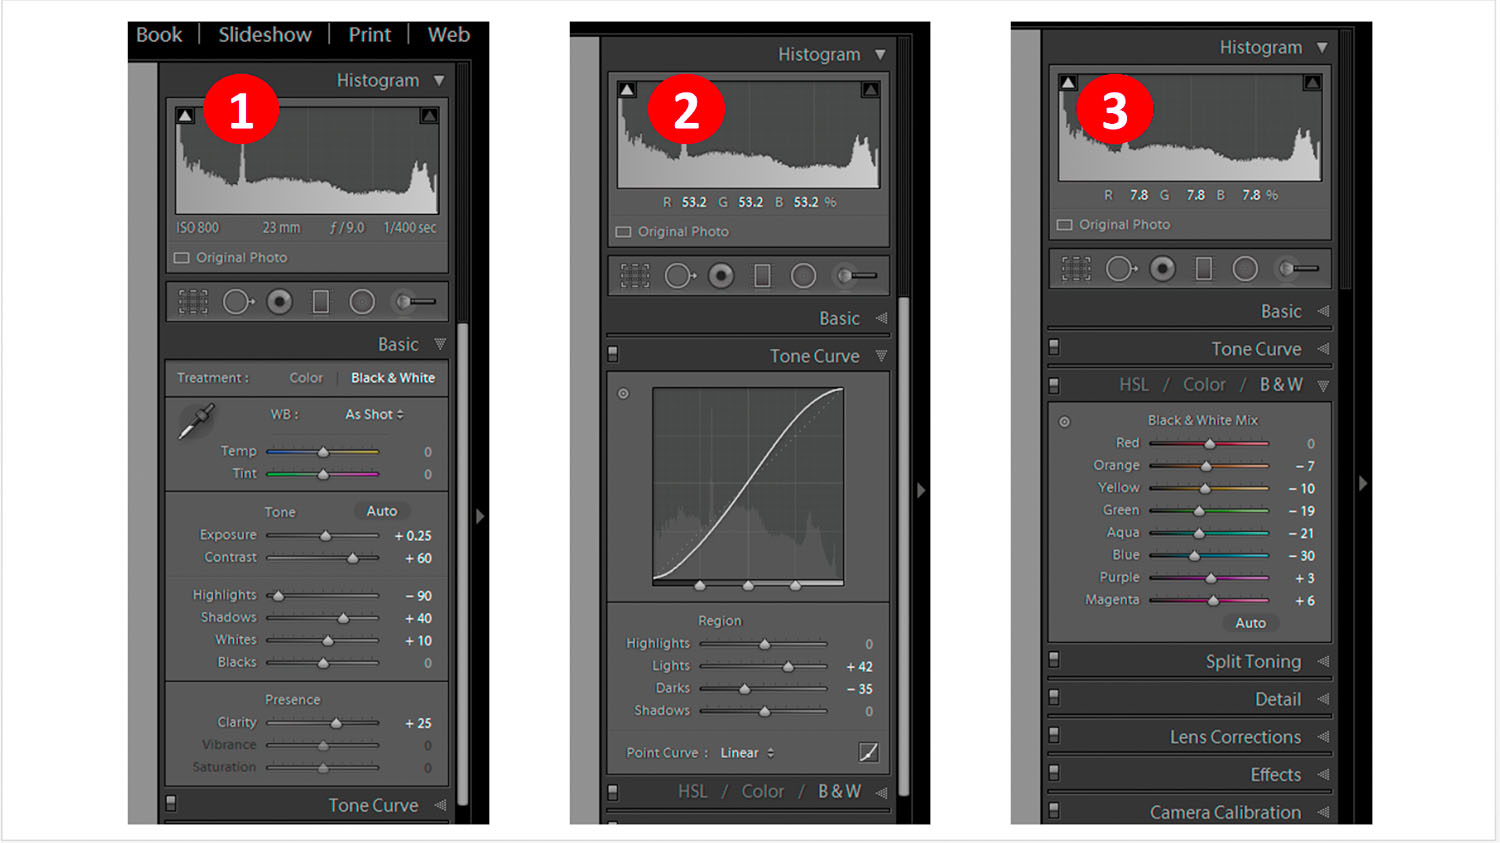
- I then basically play around some with the sliders in the "Basic", "Tone Curve" and "HSL / Color / B&W" tabs, optimizing my image until it fits the pre-visualization I had at the time of capture (note: changing color filter sliders in "HSL / Color / B&W" tab is obviously only relevant for Black & White images):
Improve your image by changing sliders in Basic, Tone Curve and B&W tabs !
If necessary I apply some retouching and/or graduated filters at this stage. The final result is what i call my "master image", from which i render web or print versions. Due to Lightroom's "non destructive" image processing I can change any slider at a later time if needed. To render web or print versions I export to another folder, apply sharpening / noise control / sizing as required and add my copyright information !
Hope you've enjoyed this post & it can help you to get the very best out of your X-Trans RAW files. Fuji sure makes fantastic lenses & sensors, but they do need some attention in post to realize the stunning rendering potential in them ;-) ! Thanks so much for reading & take care - best regards, Hendrik
I hope you enjoyed reading this post - If you like you can support me by sending me a small donation via PayPal.me/hendriximages ! Helps me run this site & keeps the information coming, many thanks in advance !


