#X100T

Gotta love The Square, improved mobile workflow

The square has a magic quality - serenely balanced, a frame in perfect symmetry, having four equal sides and four equal angles, allowing the observer's eye to focus on the essentials:

The Holy Walk - in The Square!

Originally this image was captured in my X100T's native rectangular aspect ratio, but I never liked the unimportant areas left and right of the main motif. Cropped to square it looks so much better! Ok now, what about this "improved workflow" and what's it gotta do with this square business? Before I go into that, here another example benefitting from the attention focusing effect of the square:

The order - also in The Square!

Image post processing is normally independent of how I later want to use the image. The intended final image use and size do however Influence the level of output sharpening, cropping, etc. So I modified my workflow to separate these "finishing touches" steps from the actual image post processing:

  1. First I perform all image post processing (exposure, contrast, levels/curves, shadow/hilight treatment, etc.) in Photogene4 on the imported JPEG. This saves the non destructive image adjustments as metadata which can be rolled back / modified at any time
  2. After finishing post processing I export the resulting image as a TIFF (by selecting the appropriate export settings in Photogene4) on my iPad and copy it to a previously created "edits" album on my iPad (open 'Photos' App, go to 'All Photos' album, select latest saved TIFF image and 'Add To' the "edits" album)
  3. Back in Photogene4 I open the just saved TIFF from the "edits" folder and modify output size, output sharpening, cropping and adding my copyright logo, depending on the intended final image use (web, social media, blog, print, etc.). By pressing the 'original' icon I can revert to the post processed TIFF and change the output parameters. This way I can always keep a master image file (incl. post processing) in its dedicated "edits" album

Enjoying the late afternoon sun in Sardegna

Of course if you're planning to use a square output format it's wize to already apply the 1:1 aspect ratio to your camera's viewfinder so you can properly pre-visualize your image in camera!

Early Boat

With this closing image of tourists on the ferry looking forward to new experiences, I hope y'all enjoyed the read & found something which helps you in your photographic endeavors!

Please leave me a message below or send me an email from my "about" page if you've any questions, suggestions or ideas, many thanks for your visit here and wish y'all a great, fun and satisfying holiday season!

Best regards,

Hendrik

I hope you enjoyed reading this post - If you like you can support me by sending me a small donation via PayPal.me/hendriximages ! Helps me run this site & keeps the information coming, many thanks in advance !
Mobile X-Trans Image Sharpening

Hey, Fuji's JPEG's are awesome. Fact! So, after going "mobile" with my online workflow (post processing on my iPad), I was doin' some experimenting on in camera settings & sharpening which I'd like to share here - please read on, hope y'all like it! Starting point was a nice portrait of my lovely wife:

X100T 23mm (35mm FF eq.) @ f4, 1/50sec

To save y'all from searching my previous blogs I'll do a quick recap of my simple 3-step mobile workflow here:

  1. Select best images on my X100T's LCD & perform in camera RAW conversion to Classic Chrome, with color +1; NR, highlights, and shadows -1, sharpening as required (see below)
  2. Export the Classic Chrome JPEG's to my iPad using Shuttersnitch App (for automatic adding of IPTC copyright & author info)
  3. Post processing the JPEG's on my iPad by first optimizing WB, exposure and contrast using Athentech's Perfectly Clear App and then post processing them into black & white images using Photogene4 App

For the sharpening evaluation I prepared 2 JPEG's with "capture" sharpening settings of -1 (soft) and +1 (hard) using Fuji's in camera RAW converter. Then I exported them to iPad and applied to both 1.5 strength / 0.3 radius "output" sharpening in Photogene4, see enlargements below:

Capture sharpening +1 in camera

Capture sharpening -1 in camera

For me the one which had +1 sharpening in camera during RAW conversion is on the edge (too harsh) for portraits, the milder -1 sharpening delivering the more pleasing & natural result. Here the effect on hair with same sharpening settings as above:

Capture sharpening +1 in camera

Capture sharpening -1 in camera

On request of reader here a version with -1 sharpening applied in the in camera RAW converter, but no additional sharpening applied in Photogene4 post processing:

Capture sharpening -1 in camera, no additional sharpening in post

Curious to hear what's your view? Please leave me your comments below or contact me via my contact page! Many thanks in advance for reading & for your feedback, best rgds,

Hendrik

I hope you enjoyed reading this post - If you like you can support me by sending me a small donation via PayPal.me/hendriximages ! Helps me run this site & keeps the information coming, many thanks in advance !

Going "light" - Mobile Post Processing without PC!

So, that's it. Finally I dunnit - switched my online workflow fully to mobile, meaning: Using Fuji JPEG's, RAW developed in camera & post processed only on my iPad before uploading to my blog / social media! No more PC? Well, not quite - for those of you interested, please read on ...

Rainin' up?

I always capture RAW+JPEG(F)'s. This way I have the best possible sensor output (14 bit RAW) of my Fuji X100T for later making large prints (normally up to A1), using PhotoNinja RAW conversion & Lightroom on my PC. But believe you me, the workflow for getting fine art quality prints of that size off an APS/C format sensor takes a LOT of effort, is very time consuming and very expensive to boot!

On the other hand sharing images on the web luckily don't require such stunts ... The "light", On-the-Go workflow shared here - based on using the amazing 8-bit Fuji JPEG's has proven to be more than enough for web use IMO - please take a look for yourselves:

No guests? Deserted bar in Sardegna

I already previously shared "prototypes" of this mobile workflow on my blog, but needed to further refine some steps / choice of tools to make it more fluid & efficient, here the final 6-step workflow:

  1. Capture - Fuji X100T set to RAW+JPEG(F); B(R) film sim; sharpening +1; hi-light & shadow +1; NR -1; DR, WB, ISO on auto (ISO base 200, max 1600, min SS 1/80). Configured like this the X100T acts like a "monochrome" camera with preview & review of images in contrasty B&W!
  2. After the shoot, I check the images in camera & delete those which are unsharp / poorly exposed (washed out hi-lights) and/or have unsatisfactory content (this helps reduce the amount of "waste" on storage media & in my archive)
  3. In camera RAW conversion of "keepers" to flat "digital color negatives", with following settings: CC film sim; color +1; hi-light & shadow -1
  4. Download these "color negatives" to my iPad via WiFi, using Shuttersnitch App (which automatically updates IPTC metadata with copyright & usage rights, etc.)
  5. Process on iPad into final B&W images using Photogene4 App. I did previously use Pixelmator but found the processing options in Photogene4 to be more useful (eg. hi-light & shadow recovery) and the its user interface more fluid. Only disadvantage of Photogene4 is that the healing tool can only do spot healing (instead of Pixelmator allowing me to paint over areas, but that I don't need so much anyway)
  6. Finally I add my copyright text to the image, resize to 1500 pix web dimension, save to output folder and upload to my blog / social media - DONE!

Here another example - even in 8-hit the dynamic range of Fuji's JPEG's is impressive:

Two chairs four two?

Well, I hope this was helpful for some of you? Doing PP on iPad during traveling has seriously reduced the amount of time I needed to spend staring into a PC screen at home - Now I got much more time for taking photos (or for relaxing with a glass of fine Italian prosecco ;-)

Thanks for reading, please let me know what you think (comment below or send me email)!

Best regards,

Hendrik

I hope you enjoyed reading this post - If you like you can support me by sending me a small donation via PayPal.me/hendriximages ! Helps me run this site & keeps the information coming, many thanks in advance !

Fuji X JPEG Only iPad Workflow - Refined !

After some research I've refined my Fuji X JPEG Only iPad Workflow for on-the-go image processing & uploading to blog, social media, etc. For all you impatient ;-) readers, here the final result after transfer to iPad & post processing with Pixelmator:

Nebula Man

I usually set-up my Fuji X100T to use the B-R film simulation, with shadows & hi-lights set to +1. Images are saved as large JPEG + RAW - This helps me to pre-visualize the image in black & white on the LCD screen and allows me to later develop a flat color "digital negative" JPEG from the saved RAW file using the in camera raw conversion. For this I use following settings: Classic Chrome film simulation, color +1, hi-lights and shadows -1, sharpness +1 and noise red. -1 (of course I always still have the RAW file as original back-up and for creating fine art prints on my PC in Lightroom, if needed !):

"Nebula man" converted in camera to flat color "digital negative" JPEG

I then import these color JPEG's onto my iPad using the Shuttersnitch App, which has an easy WiFi connection and IPTC (copyright, usage rights) updating feature. After saving the images to the iPad's camera roll I perform some basic post processing in Pixelmator for iPad, using the simple workflow explained in some screen grabs below:

"Nebula man" flat color JPEG in Pixelmator, after opening "adjust colors" menus

After opening the color JPEG in Pixelmator I go to the "adjust colors" menu & convert to black & white by selecting "B&W":

... Converted to Black & White

Then adjust the sliders for levels (black & white points), brightness, and contrast to your liking. The color sliders can be used to modify shades of grey depending on their original color (eg. darken blue sky, similar like you can do in Lightroom), but their effect in Pixelmator is limited (according the App developer this will be improved in a future App update):

Adjust sliders to your liking ...

You can adjust shadows & hi-lights by modifying curves:

Finally the adjustment of curves ...

For me very important to add a copyright to my image - Pixelmator is one of the few Apps which has an extensive texting option (with many fonts, styles and renderings to choose from). See the following images as example:

Add the "©" symbol,

Date & photographer's name,

... and move the text block to the desired position !

Finally resize the image for upload to blog or social media:

Resize for upload to blog or social media (1500 pixel long side):

... and save to camera roll (Save to Photos):

Finally save to camera roll !

That's it, I hope this was useful to y'all & that you enjoyed the post ! Many thanks for reading & let me know if you have any questions or comments, I'm interested to hear what approach you might have for working On-the-Go !

Have a great day & all the best wishes, best regards,

Hendrik

I hope you enjoyed reading this post - If you like you can support me by sending me a small donation via PayPal.me/hendriximages ! Helps me run this site & keeps the information coming, many thanks in advance !

Go Light: Just JPEG & iPad - is it enough ?

Hey, the JPEG's coming out of my Fuji X100T are really amazing ! So much that I looked for a "light" image processing solution for "On-the-Go" & found a great full featured photo editor for iPad called Pixelmator. See below example image of the famous Roman aqueduct in Segovia, Spain:

Roman Aqueduct in Segovia, Spain

For this I developed following simple "On-the-Go" imaging workflow which I'd like to share with y'all:

  1. Set up my Fuji X100T to take rather neutral / flat color images (kinda digital "negative" with maximum dynamic range, if you like):
    • Classic Chrome
    • Hi-light -1
    • Shadow -1
    • Color +1
    • NR -1
    • Sharpen +1
    • JPEG+RAW (to still have a RAW backup ! ;-)
  2. Import images to iPad using Fuji's Wifi connection App or Apple's lightning to
    SD card connection kit
  3. Use "Pixelmator" App to optimize image (exposure, contrast, levels, color, etc). If you prefer Black & White you can use the color sliders to influence the grey tones !
  4. Upload finished images to my site

The advantage of this approach is that you can process & upload your images while travelling, just using an iPad w/o any compromise on image quality (at least for web applications) and you still have the back-up original RAW files to make fine art prints !

Hope you liked it ! Curious about your comments, many thanks in advance for looking & wish y'all a great weekend !

Best regards, 

Hendrik

I hope you enjoyed reading this post - If you like you can support me by sending me a small donation via PayPal.me/hendriximages ! Helps me run this site & keeps the information coming, many thanks in advance !

TWO of a Kind !

OK, So it's been quite a time since my last blog post - my sincere excuses to those who have been eagerly waiting for news ;-) ! I was quite busy & couldn't spend as much time on my blog as I'd have wanted to, still, I hope y'all will enjoy this post about looking for & finding pairs of things - "TWO of a Kind !"

Two Funnels

I like the symmetry of this image, broken by the vertical shadow on the wall and the random nature of the clouds. Also the vertical lining of the clouds contrasts nicely with the horizontal wall panels. I further abstracted the image by pointing the camera nearly straight up, making the normally vertical funnels look as if they're lying down. I always look for such conflicting elements to bring tension into my images, here's another example:

Two Pillars

Two vertical columns in the Botanical Gardens of Villa Melzi in Bellagio, Lake Como (be sure to take a look if you should be in that area - really worthwhile and very relaxing !). Looks like the shorter pillar just got some help from the vertical cloud formation on the top right !

The image below was captured on the terrace of a hotel with lemon trees, where some of the lemons had fallen off & I could take the image before the personnel had a chance to remove 'em !

Two Lemons

Here the round shapes of the fruit and the ashtray in the back are nicely contrasted by the regular pattern of the wicker table !

For those interested all images were taken on Fuji X100S and Fuji X100T cameras and the resulting RAW files developed in Photo Ninja, subsequently fine tuned in Lightroom.

Hope y'all liked my post ! As always your comments, constructive critique and questions about the images, technique, gear are most welcome ! Just drop me a message on my contact page or send me your comment below ! Many thanks in advance & wish y'all a great Sunday, best regards,

Hendrik

I hope you enjoyed reading this post - If you like you can support me by sending me a small donation via PayPal.me/hendriximages ! Helps me run this site & keeps the information coming, many thanks in advance !
X100T = View FINDER !

My Fuji X100T's OVF (Opical View Finder) does exactly that: It FINDS VIEWS ! Like the view below thru an arch in the ancient town of Pescia in Tuscany, Italy:

Pescia, Tuscany - View thru arch

Sure, you can precisely preview your image on a digital camera's LCD screen or thru the lens of a DSLR, but I prefer the superior clarity and brightness of the X100T's optical viewfinder, which intuitively helps me to frame the part of the scene I wanted to show:

Barred Window

 In fact this is one of the main reasons I have chosen to go back & limit myself to this one camera / one lens combo - NO more fussing about equipment and more focus on making the image !

3 Steps to ... Heaven ?

I hope y'all enjoyed today's post - please let me know ! Thanks for visiting & my best wishes for a great weekend, best regards,

Hendrik

I hope you enjoyed reading this post - If you like you can support me by sending me a small donation via PayPal.me/hendriximages ! Helps me run this site & keeps the information coming, many thanks in advance !

INTO the Light !

Here in Europe we have them: Seasons, the cyclic changing of nature’s weather, temperatures, colors, … and Light ! After the dark, wet and cold of winter it’s great to enjoy the warmth & light of the sun’s spring rays … that’s what I’ve tried to capture in these images:

Terrace of VIlla Sermolli in Buggiano Castello, Tuscany

Lovely, how the afternoon Tuscan sun lights up the first spring blossoms and breathes life into the weathered terrace of the gorgeous 16th century Villa Sermolli and overgrown backyards of Buggiano Castello, Tuscany:

Overgrown Backyard in Buggiano Castello, Tuscany

The good thing about spring is that the light’s still coming in low during the day, allowing it to better sculpt textures and shapes on otherwise unremarkable subjects, like this back alley in Montecatini Terme:


Below diffused lighting after sundown highlights the white marble of the fountain, while the water turns inky black from the reflection of the dark evening sky !

Back Alley in Montecatini Terme, Tuscany

Fountain after Sundown

For those interested, all this was shot using the amazing Fujifilm X100T; Always with me, never in my way, delivering fantastic rendering and image quality, THANKS Fuji !

Post processing: No cropping, RAW development using Photo Ninja and some contrast enhancement using Tone curve in Lightroom ...

I just never cease to be amazed by the dynamic range & highlight headroom of the Fuji X-Trans sensor !

So, I hope y'all enjoyed this week's blog post, many thanks for visiting & reading – As always your comments & constructive critique are most welcome and appreciated, thanks in advance & best regards

Hendrik

I hope you enjoyed reading this post - If you like you can support me by sending me a small donation via PayPal.me/hendriximages ! Helps me run this site & keeps the information coming, many thanks in advance !

NO Time & Your Images SUCK ?

Recognize this ? You're stuck in the rat race of your day (and night) job, and/or your agenda’s jacked with back-to-back assignments – all maybe good for the biz, but …

Somehow your creativity seems to haven gotten lost along the way, and the lighthearted joy of creating what YOU fancy has meanwhile become a long forgotten memory - Your images SUCK. Big time !

Afternoon Sun's Shadows

And ... you unfortunately don’t have the opportunity to make them more interesting by going exotic places to take photographs ... :-) ? Today I'd like to share what worked for me:

Look around & experiment ! Often the beautiful effects of light are right there, in front of your eyes (while you were too preoccupied with dreaming of those far away locations) !

In my case it was the light of the afternoon sun passing thru the regular geometric shapes of the metal grille outside our window, creating distorted shadows on the uneven folds of our curtains ...

A Different Perspective ...

RAW processing in Photo Ninja preserved the highlights. Then I went B&W in Lightroom & only manipulated the curves a bit (the tonality curves of course, not the curtain's ;-) ... The result’s quite interesting, don't you think ?

Your constructive critique & comments are, as always, most welcome ! Looking forward to hearing your view - thanks for reading, take care & best regards,

Hendrik

I hope you enjoyed reading this post - If you like you can support me by sending me a small donation via PayPal.me/hendriximages ! Helps me run this site & keeps the information coming, many thanks in advance !

Pimp Your Gear - Cool X100T Accessories !

Just got my Lensmate X100T Thumbrest last week, together with a red concave soft release (thumbrest available in silver & black; soft release in various forms & colors): In my view really cool pieces of kit as they dramatically improve the ergonomics & handling of my Fuji X100T camera in action !

Lensmate X100T Thumbrest™ & Red Concave Soft Release

Without the thumbrest I tend to get a cramped grip after carrying the camera for a while (and I don't fancy neck straps as they always get in the way) ! The soft release enables me to use around 1 stop slower than usual shutter speeds without experiencing camera shake !

A note of caution: ALWAYS ensure the camera is switched OFF (power switch collar turned to left) before storing the camera, as the more exposed soft release button otherwise could lead to drained batteries and/or thousands ;-) of blank exposures in case something in the bag presses on it !

BlackRapid's SnapR35 Optimal Transport Solution !

Other accessories I use are the Fuji LH-X100 filter adapter ring & lens hood, a B+W slim 49 mm UV filter, an Expert Shield screen protector and the bottom part of the Fuji LC-X100S leather case. The best bag solution for the X100T from my point of view is the BlackRapid SnapR35™, mainly because of its easy / one-hand operation & combined bag / strap function !

Hope this post is interesting for some of you fans of the Fuji X100 range out there, enjoy your photography & take care, best regards & thanks,

Hendrik

I hope you enjoyed reading this post - If you like you can support me by sending me a small donation via PayPal.me/hendriximages ! Helps me run this site & keeps the information coming, many thanks in advance !

Taming the Beast ! X-Trans RAW, Part 2

You liked PART 1 ? Already curious about PART 2 ? OK, as promised last week today I would like to follow up with PART 2 of my X-Trans RAW converter evaluation by sharing ALL the results - wish y'all an interesting read, please check it out below !

Behind the House ...

But in order to allow easy comparison, I've used the same RAW image as last week, a house façade in Buitrago del Lozoya in Spain ...

the following 4 main X-Trans RAW converter (Windows only) options were analysed:

  1. Picture Code’s Photo Ninja 1.2.4, with post processing in Lightroom
  2. Phase One’s Capture One Pro 8.1.1 (all-in-one solution)
  3. Adobe’s Lightroom 5.7, with embedded ACR (all-in-one solution)
  4. Silkypix’s Raw File Converter EX 3.2.22, with post processing in Lightroom

Please see below the results - click on the images below to see an enlarged version:

Photo Ninja

LIghtroom

Capture One Pro

Silkypix

And here (finally ;-) the detailed evaluation of the various (windows only) RAW converters & post processing (if needed):

1. Photo Ninja & post processing in Lightroom:
Delivers the best detail & highlight recovery, but colors are difficult to manage & a bit more noise reduction is needed in LR (details, please see my previous Post here and integrated Photo Ninja / Lightroom workflow here):

2. Capture One Pro:
More natural colors (less corrections needed) but vs. PN less sharp detail rendering & less highlight recovery, see "Capture One Crop 1". Don't need additional noise reduction, but tendency to show conversion artifacts (see door bell panel in "Capture One Crop 3"). Advantage is the "All inclusive" integrated workflow !

3. Lightroom (using built in Adobe Camera RAW converter):
Main issue here, from my point of view is still the well know "smearing effect" (albeit better than previous versions) and lower detail rendering, see "Lightroom Crop 1". Like Capture One also this one has an "All inclusive" integrated workflow !

4. Silkypix & post processing in Lightroom:
Also here less highlight recovery and lower detail rendering, see Silkypix detailed crops. Apart from this Silkypix from my point of view has a complicated user interface which needs some getting used to ...

Photo Ninja Crop 1

Capture One Crop 1

Lightroom Crop 1

Silkypix Crop 1

Photo Ninja Crop 2

Photo Ninja Crop 3

Capture One Crop 2

Capture One Crop 3

Lightroom Crop 2

Lightroom Crop 3

Silkypix Crop 2

Silkypix Crop 3

As you can see (recapping my last week's conclusion in PART 1 of this evaluation), from my point of view Photo Ninja has the best detail rendering and highlight recovery potential, followed by Capture One Pro, Lightroom and Silkypix !

But I'm sure some of you out there will come to different conclusions, better fitting & optimized for your way of working, so looking forward to an interesting discussion !

Hope you enjoyed the read, please let me know by entering your comments on this page, or by sending me a message via my contact page if you've any questions - I'll be happy to answer them !

many thanks, Hendrik

I hope you enjoyed reading this post - If you like you can support me by sending me a small donation via PayPal.me/hendriximages ! Helps me run this site & keeps the information coming, many thanks in advance !

The Very Best X-Trans Lightroom Workflow !

OKOKOK - or maybe the very worst ;-) ... All depends on your preferences and from which perspective you look at it ! I just prefer to spend as little time behind a computer screen as possible & rather'd go out take some PIX ! ... Like this one, i found in Buitrago del Lozoya, Spain where there's a great Pablo Picasso Museum: Go on and take a look, if you get a chance, you sure ain't gonna regret it !

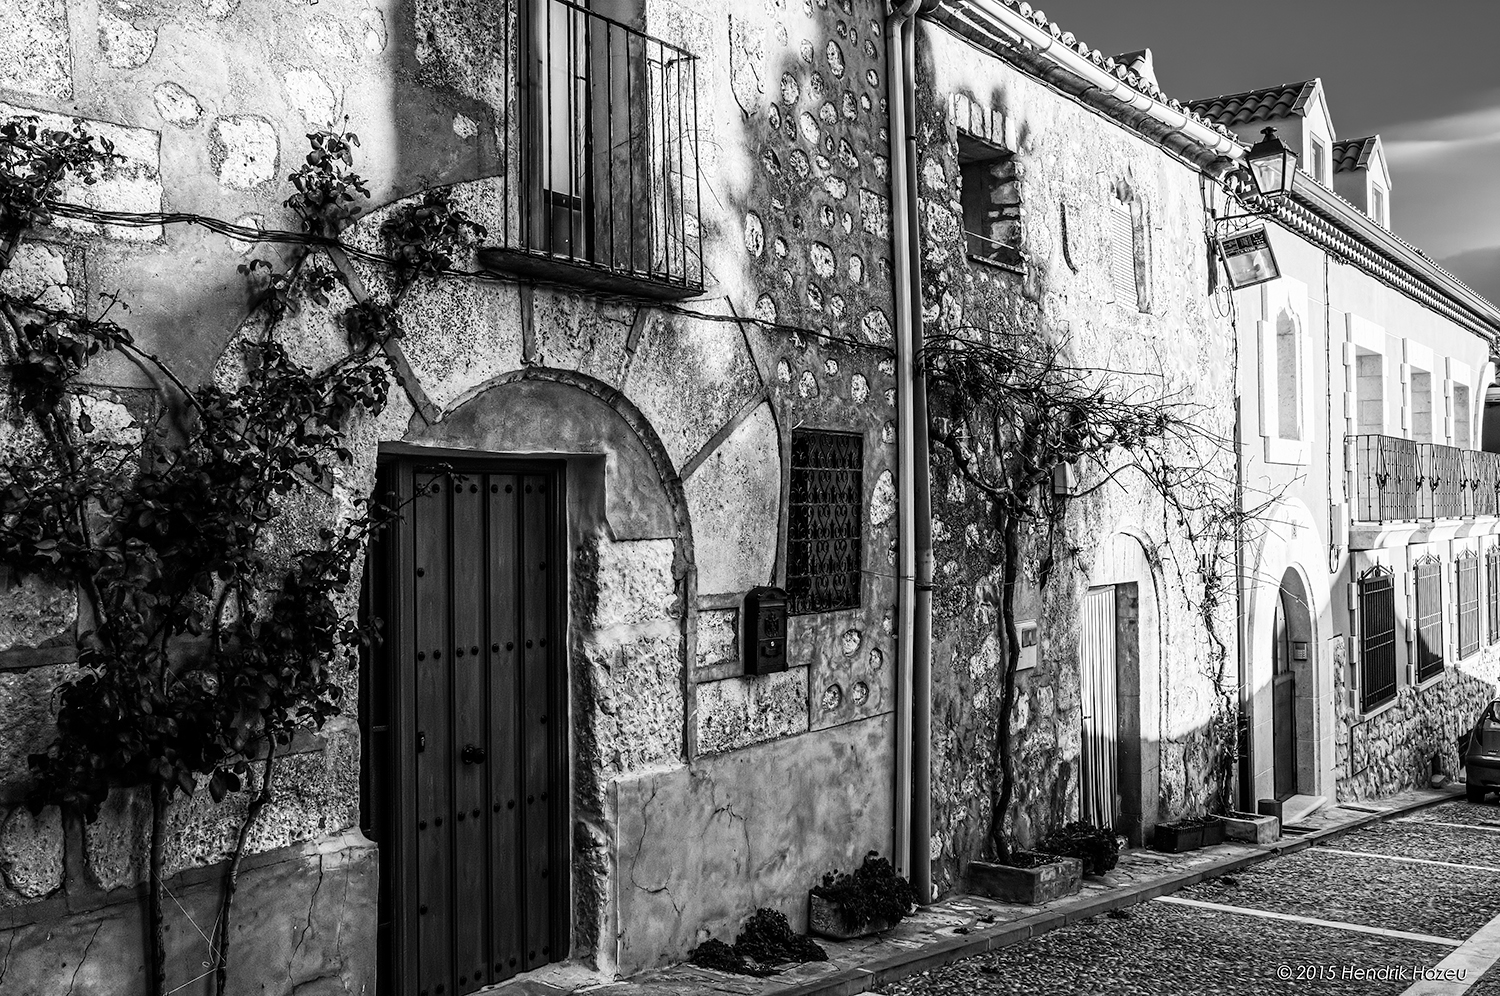
Lovely House Façade in Buitrago del Lozoya, Spain

Lovely House Façade in Buitrago del Lozoya, Spain

Anyway - in this Blog i'd like to share my X-Trans workflow. Yeah I know this kinda topic has been beaten to death elsewhere, but after reading 'em all i developed my own "simplified" workflow & hope it's of some interest to you X-Trans fans out there !

So, before X-Trans life was easy: import images, move some sliders around, DONE ! Then along came Fuji with their ab-so-lute-ly AWESOME APS-C X-Trans sensor - and nothing worked no more ! Even Adobe's latest re-incarnation of Lightroom 5.7 still don't cut it for me: The converted RAW files still often demonstrate the dreaded "smearing effect" on green foliage and other small details ...

After some research i stumbled over Picture Code's Photo Ninja with a nifty solution to integrate their RAW converter into a Lightroom workflow ! Here's how it works best for me:

  • Import images (RAW+JPEG seperated) into date stamped folders on my laptop
  • Sort, rate & add copyright info using Camera Bit's Photo Mechanic software
  • Copy images selected for processing into Lightroom auto import folder, see here how to set that up ...
Sort, Rate and add © in Photo Mechanic ...

Sort, Rate and add © in Photo Mechanic ...

  • Open Lightroom & your copied images will magically import & appear:
Open Lightroom & see your auto-imported images !

Open Lightroom & see your auto-imported images !

  • From the Develop module export your selected image to Photo Ninja. if you've set up Lightroom & Photo Ninja as indicated here, this will make Photo Ninja open the original RAW file with the same file name, see below:
Original X-Trans RAW file opened in Photo Ninja !

Original X-Trans RAW file opened in Photo Ninja !

  • In Photo Ninja I just make sure that I get a "digital negative" with maximum dynamic range to have the best starting point for later post processing - normally it's all about recovering highlights (and Fuji X-Trans files have a lot of highlight headroom !). See these great Photo Ninja tutorials to learn more !
  • I then hit "save", which makes Photo Ninja overwrite the TIF file in Lightroom:
Photo Ninja overwrites the TIF file in Lightroom !

Photo Ninja overwrites the TIF file in Lightroom !

  • This TIF from Photo Ninja exhibits wonderful details rendering & now includes an amazing dynamic range - ideal as a starting point for my subsequent post processing in Lightroom !
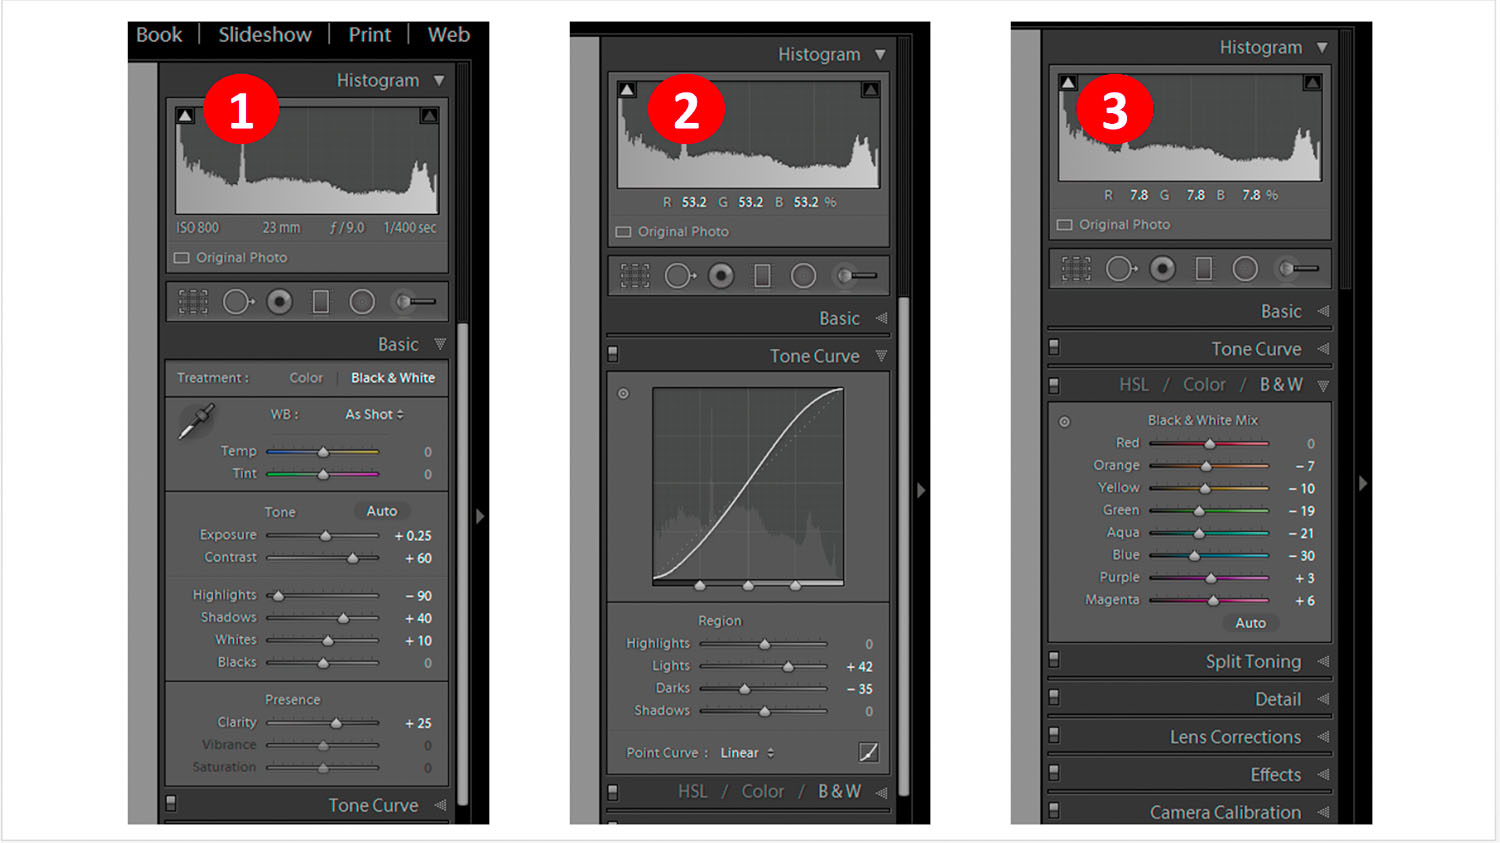
  • My first step back in Lightroom is to render the image to Black & White in the Develop module's "Basic" tab (but you can also skip this if you prefer color):
First step in Lightroom is to  change over to Black & White ...

First step in Lightroom is to  change over to Black & White ...

  • I then basically play around some with the sliders in the "Basic", "Tone Curve" and "HSL / Color / B&W" tabs, optimizing my image until it fits the pre-visualization I had at the time of capture (note: changing color filter sliders in "HSL / Color / B&W" tab is obviously only relevant for Black & White images):
Improve your image by changing sliders in Basic, Tone Curve and B&W tabs !

Improve your image by changing sliders in Basic, Tone Curve and B&W tabs !

If necessary I apply some retouching and/or graduated filters at this stage. The final result is what i call my "master image", from which i render web or print versions. Due to Lightroom's "non destructive" image processing I can change any slider at a later time if needed. To render web or print versions I export to another folder, apply sharpening / noise control / sizing as required and add my copyright information !

Hope you've enjoyed this post & it can help you to get the very best out of your X-Trans RAW files. Fuji sure makes fantastic lenses & sensors, but they do need some attention in post to realize the stunning rendering potential in them ;-) ! Thanks so much for reading & take care - best regards, Hendrik

I hope you enjoyed reading this post - If you like you can support me by sending me a small donation via PayPal.me/hendriximages ! Helps me run this site & keeps the information coming, many thanks in advance !

Less is often MORE !

In my previous post I described how I'd "dumped the ballast" & gotten rid of all my gear, to "survive" on just ONE lens - Fuji X100T's 23 mm / f2 (field of view comparable to a 35 mm moderate wide angle on Full Frame). At first I found myself cursing my romantic dreaming and rash decision: When reaching into my bag for that subject-isolating telephoto or the all-encompassing ultra-wide I found ... ?
Yep, that's right: NOTHING (coz the X100T was already in my hand ;-)

But then I found that this self-limitation had a positive effect on my approach to photography. This was my first frame of shadows on a stone terrace, which had attracted my attention:

First Impression of Shadows on Terrace !

First Impression of Shadows on Terrace !

Read on to find out more ! ...

What Created the Shadows on the Terrace ?

What Created the Shadows on the Terrace ?

Not anymore having all the lens options to distract me, I was forced more to FOCUS on my subject and on how to position it the frame to replicate my initial impression when first seeing it. I found I wanted to show also the decorative railing responsible for creating those shadows !

Furthermore I started to take many more images of the same subject, from different angles, with different framing, from varying distances, gradually "carving" out my image of the subject (a bit like a sculptor does with his chisel ... ;-) ... And so i got a wealth of results I previously never would've gotten (hey, before this i was averaging MAX. 1-2 frames per subject, using a zoom to frame the subject w/o changing my position). Yeah, I know you can limit yourself with any one lens, but for me the simple fact of NOT having ANY alternative at all was the proverbial kick I needed to jolt me out of my zoom-lethargy !

Here some more examples - up to you which you like best (please see more also in my portfolio by clicking this link: Shadows Fall) !

fence shadows on terrace.jpg

Also playing with narrow depth of field delivers an image with a completely different character:

shadows narrow depth of field.jpg

Hope this is a little inspiration to y'all, helping you also to focus more on your subject ! Please let me know what you think & enjoy ! Thanks for reading, best regards, Hendrik

I hope you enjoyed reading this post - If you like you can support me by sending me a small donation via PayPal.me/hendriximages ! Helps me run this site & keeps the information coming, many thanks in advance !

Back to the roots ...

It was before X-Mas last year when i had this revelation, reminding me of Bill Murray in the great movie "Groundhog Day": 2 years ago I'd traded my full frame DSLR gear (Canon 5DII with a full set of L-lenses) for a "compact mirrorless APS-C" setup (Fuji X-Pro1, X100S, then XT-1, ...), but before I knew it a new bunch of lenses had found their way into my kit and the "compact" attribute kinda got lost along the way ...

STOP ! ... Dump the ballast !

STOP ! ... Dump the ballast !

Fruit Bowl Shadows

Fruit Bowl Shadows

So there i was, stuck (again) with an albeit smaller but still substantial load around my neck, spending more time debating which lens to use than focusing on taking the shot, often missing great opportunities while my bulky camera / lens bag was happily sitting at home !

I tell you that sucked. BIG TIME ! So I decided to get rid of it all, "dump the ballast" ... hang on, ALL ? Yes, ALL !!!
I replaced it with just ONE camera (Fuji X100T) & solemnly vowed to stick to this limitation at least for the rest of 2015 ! Will keep y'all posted ! Thanks for reading, best regards, Hendrik

I hope you enjoyed reading this post - If you like you can support me by sending me a small donation via PayPal.me/hendriximages ! Helps me run this site & keeps the information coming, many thanks in advance !