#rawconversion

Fuji RAW Worms - Has Adobe Finally Nailed It?

Got worms? Then you must be photographing in RAW with Fuji cameras and gotten suckered into a life-long relationship with Adobe’s Creative Cloud subscription model (just like me ;-) Don’t worry, you ain’t gotta take no nasty medicine anymore to get rid of them worms, coz I got good news for ya! Please read on if interested and join the discussion below in the comments …

The Hof Garden in Bayreuth, captured on Fuji X-H1 with XF 56mm F/1.2 @F/8 1/20sec ISO 200, ACROS-R JPEG

Adobe seems to have gotten their act together!? Finally … So, you may not need to get a divorce & ditch that subscription after all (they probably ain’t gonna let no-one escape anyway … ;-) Anyways, at the end of the day Photoshop and Lightroom are still the global standard when it comes down to pro digital asset management & post processing

But before discussing the cure let’s first understand the problem (for those of youse new to Fuji or contemplating joining the Fuji family). Simply put digital sensors are comprised of millions of photo sites (“pixels”) which measure the amount of light (number of photons) hitting them. To allow the camera to see the world in color the sensor is overlaid by a color filter array (CFA) of red, green and blue color filters in a distinctive repetitive arrangement, allowing the camera software to recompile the light levels into color information. This reconstructing of the full color information from the individual pixels is called “Demosaicing”. Obviously the demosaicing algorithm needs to match the arrangement of the color filters, otherwize you will not get the image you saw thru the viewfinder …

Color Filter Arrays used in digital camera sensors:
Fuji vs. the rest of the world (note the green “X” ;-)

All makers of digital cameras use a so-called “Bayer” color filter arrangement (repeating a 2 by 2 pixel pattern of 2 green, 1 red and 1 blue filters). Hang on, ALL makers of digital cameras? No. Fuji has implemented a different arrangement of color filters, repeating an alternating 3 by 3 pixel pattern of 5 green, 2 red and 2 blue filters, they call “X-Trans” (the “X” referring to the X-formed arrangement of the green photo sites)

Fuji claims this “X-Trans” arrangement delivers a more “film-like” rendering due to the less regular pattern and better performance than the Bayer arrangement, especially improving the micro-contrast due to the higher percentage of green pixels (55% vs. 50%). See here for more information. Demosaicing software optimized for the Bayer CFA layout (as used in Adobe’s Camera RAW converter at the heart of Lightroom & Photoshop CC) can cause trouble when applied to the X-Trans CFA layout, especially with small repetitive patterns, like foliage & brick structures

Now here’s the thing: I think that Fuji’s proprietary CFA layout is not even fully managed by their own in-camera demosaicing algorithm (albeit becoming visible only at more extreme magnifications). When you enlarge the below in-camera converted JPEG to a magnification corresponding to an approx. 20x30 inch / A1 size enlargement you can start to actually see the “worms”:

Fuji’s in camera JPEG conversion’s got worms!

Fuji’s in camera JPEG conversion’s got worms!

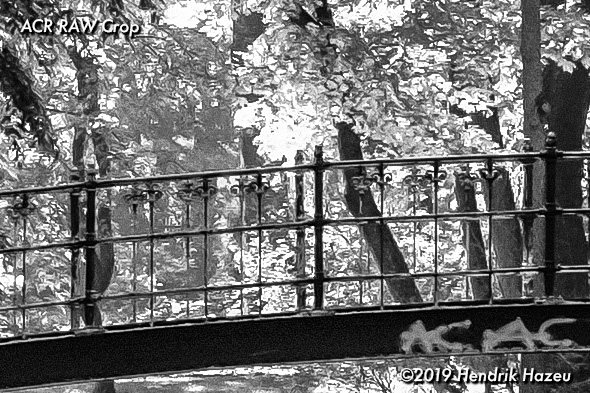
At mural sized prints (as I do for exhibitions) you will see these painterly, wormy artefacts (see the bridge railing and the mushy area in the upper left quadrant of the above image- there should have been some branches visible there)! Don’t get me wrong - you’ll probably never have any problem with images prepared for web viewing or normal sized enlargements, using printers up to 13”x19” / A3+ size when viewing them at normal viewing distance. But for big enlargements using JPEG’s is no option anymore. For anything above 12”x17” / A3 size you gotta go RAW. Unfortunately Adobe’s Camera Raw converter don’t do much better either, see the image below - in my opinion not much different compared to the in-camera JPEG conversion:

Adobe Camera RAW’s conversion also got worms!

Adobe Camera RAW’s conversion also got worms!

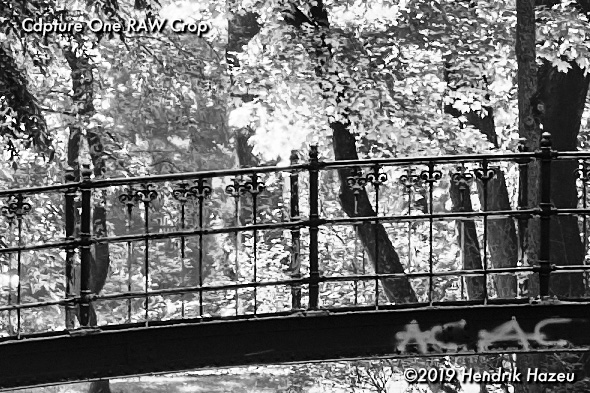
You can see the vertical rods of the railing are partly obscured by foliage and the branches in the upper left quadrant are still not visible. Not good, I’m afraid this even happens with the sharpening settings optimized for X-Trans (low “amount” & high “detail”)! So, what to do? Apart from using external RAW converters known to work satisfactorily with the X-Trans sensor layout, like Iridient or RAW Therapee there is for me only one bit of software which has a good X-Trans demosaicing performance, while combining RAW conversion and image management (I really don’t like having to split my workflow over separate bits of software …): Capture One Pro. Let’s see how that fares:

Capture One Pro. Less “wormy” but a little bit too harsh for my fancy …

Capture One Pro. Less “wormy” but a little bit too harsh for my fancy …

From my point of view it’s better - the vertical rods of the railing are now barely visible and you can see a hint of the branches in the upper left quadrant, but the it does look somewhat harsh now (also here I used my preferred settings but left out the grain to be comparable to the other images). To be fair I’ve happily been using Capture One for a while now as my preferred “heavy duty” solution for large printing (A3+ & larger). But I gotta say I’m not completely happy with Capture One’s user interface - maybe that’s because I mainly use Fuji’s in-camera converted JPEGs (for around 90% of my work) and am therefore used to Lightroom’s interface & workflow. Using Lightroom and Capture One in parallel means that I also need to maintain 2 separate catalogues and processed image folders on my MacBook Pro. So, when Adobe released their new “Enhance Details” feature end February this I was naturally intrigued & curious if it would do better with X-Trans images! See below the result, straight outta Lightroom, using Enhance Details (this creates a DNG in the same catalogue as a new “digital negative” which can be further processed in Lightroom just like a RAW file):

Adobe Camera Raw’s new Enhance Details feature

Adobe Camera Raw’s new Enhance Details feature

In my opinion this is far better than the previous examples, the bridge railing and the foliage have a more natural look. And you can now see the branches in the upper left quadrant (directly below the words “Enhance Details” ;-)! For my workflow this means I can process my ACROS JPEG’s as usual and apply Enhance Details with subsequent RAW development of the DNG file for those images earmarked for big enlargement / fine-art printing. Finally Adobe seems to have listened to us Fuji photographers, the results achievable with the “Enhance Details” feature are impressive! There’s only two caveats: 1. Enhance Details needs a lot of computing power (30-40 sec on a reasonably fast 2016 MacBook Pro), so those of youse with older machines might need to go out for lunch while batch processing the results of your latest photo-shoot … ;-) 2. the Enhance Details adds a DNG file to your drive for each processed image which is approx. 50% larger (around 150MB) than an average Fuji RAW file, eating up your disk space at an alarming rate!

Here the same image as before, developed by ACR Enhance Details into a DNG and processed to taste in Lightroom:

The same image developed from the Fuji RAW file, using Adobe ACR´s Enhance Details feature!

Another example with many small details in the grass & foliage:

Contre-jour image of trees in Bayreuth’s Hof Garden, captured on XF 56mm F/1.2 R @F/5.6, 1/140 sec, 400 ISO

I hope this post was interesting for you & y’all could get something from it for your own photography. Enjoy your Sunday & wish you all the best for your photographic endeavours,

Many thanks for visiting, please leave me a comment below if you have any questions or feedback, best regards

Hendrik

If you like you can support me by sending me a small donation via PayPal.me/hendriximages ! Helps me run this site & keeps the information coming, many thanks in advance!

Into the Light, with Fuji X100F !

Aren´t we photographers all seekers? Always searching for the best. Always experimenting, trying, testing. Best images, best light, best gear, best software, best deal, best whatever? Last week´s favorite turning into this week´s dog? To those of youse been following me, relying on me to stay true: I´m sorry, ashes on my head, I lost it. Really. I´m leavin´ my trail & gettin´ outta my comfort zone. Hey, I kid you not: just recently I was singin´ praise for just doing ACROS JPEG´s & an easy workflow. Now I´m sold on doing RAW´s in Capture One! Interested why? Please read on!

Into the light, found by Fuji X100F´s 23 mm, processed in Capture One "with Style" ;-) !

At least some consolation: I´m still a black & white guy! Color´s just not my thing, Never been. I always look for the light. And shadows. And contrast - color´s just in the way. Found out that´s why I never liked developing RAW´s in Lightroom & Co. Hated seeing my black & white´s appear as color thumbnails (And no, I´m not into cosmetics ;-) kinda disrupts my workflow...

Together but still alone, captured by Fuji X100F, 23 mm, developed in Capture One B&W style

That all changed when a window popped up on my Capture One workspace the other day, advertising "Styles" ("Jeezus, Spam", I thought. OK, just get rid of it ...). But C1´s promise kinda intrigued me & I clicked the "Learn more" button! First thing I "learned" was that this was gonna cost me like 80 Dollars. What? 80 bucks? Whoa daddy, a kinda steep price for a bit of learning!

500 shades of grey, seen with Fuji X100F, 23 mm, developed with BW-15 (grey) style in C1

But luckily they got a freebie samples download with one "BW-15 (grain)" style, which I activated in my Capture One´s import menu (together with auto adjust). This automatically imports RAW´s into C1, does some basic dynamic range optimization, applies this BW-15 (grain) style and spits out be-ooti-ful black & white thumbnails in C1´s browser plane

Stairway alley, Fuji X100F, 23 mm and Capture One with BW-15 (grey) style

The real surprise comes when you open ´em and just tweak exposure, contrast, brightness and levels a bit: Into the Light is all I can say. And the gradation & grain´s close enough to by beloved ACROS, it´s got MOJO, man! See below image of my lovely wife during a recent trip to Sicily:

Italian fashion shoot with Fuji X100F, developed in Capture One BW-15 (grey) style

I hope y´all enjoy these images & experiment for y´self, it´s easy. And fast. No Lightroom where you can go have lunch while its processing. So, if you got any questions or suggestions, like or not like the images, or wanna share your stories, please leave me a note in the comments below or on my contact page! Thanks for stopping by & wish a great weekend!

Hendrik

I hope this post was helpful / interesting for you - If you like you can support me by sending me a small donation via PayPal.me/hendriximages ! Helps me run this site & keeps the information coming, many thanks in advance!

Picktorial - A New Kid on the Block for Fuji Fans!

Hi! Stumbled over this: Picktorial v3 post processing software (Mac only - special introductory offer!). Many thanks to Fujirumors (good place to get the latest Fuji news) and Thomas Fitzgerald (where I always go for expert image processing advice) for pointing me to it! The main reason I´m now starting to use it for all my post processing is coz for the first time there is ONE SIMPLE, intuitive platform for image management AND processing, compatible with Fuji JPEG and (compressed / uncompressed) RAW images, please read on how so!

Candles in Church, Fuji X-T2 and XF 23mm / f2, ACROS JPEG processed in Picktorial

As mentioned before here I mainly use ACROS JPEG´s & rarely do RAW anymore. So, a couple weeks ago I was in an awesome Russian orthodox church with my lovely wife & fancied capturing the rich gradations and tonality of this scene. Then I would´ve developed the ACROS JPEG with Lightroom CC (LR) and resorted to Capture One (CO) in case I´d want to try any fancy RAW processing ... But I really don't like hulking for hours behind a computer. Nope. And, using different bits of processing software means I need to have all kinds of directories on my Mac to save intermediate versions of my images (I´m kinda paranoid about losing my work ...). On top of this both LR and CO use catalogues, so I need to manage and back up those too ... I tell ya, I could've become an IT expert (who maybe gets to take a photo now and then ;-). No sir, not good. Not good at all!

Picktorial has an intuitive, fluid & simple user interface (look & feel very similar to Apple´s legendary Aperture, which was unfortunately discontinued). Overall it´s very minimalistic: No jumping around between library and develop panes as in LR. It works directly in your image capture folder and stores your image edits in the image file (for JPEG, TIF, DNG) or in a XMP sidecar file (for RAW) w/o changing the original image. By this non-destructive workflow you can backtrack your work anytime (even taking out single steps) and save your image as often as you want without any image degradation. If you want to transfer your images just be sure to copy the whole directory (images incl. the XMP files), then you can just pick up from where you left off!

Russian Orthodox Mural, Fuji X-T2 and XF 23mm / f2, ACROS JPEG processed in Picktorial

Another great Picktorial feature is the luminosity masks (yes, photoshop has those too, but it´s much easier to use with Picktorial), please check out this great instruction video from Eric Marcs at findingmiddleearth.com (I´m still a learner on how to do that properly ;-)

The only additional feature I could wish for is to have a mobile version for my iPad which can sync with the desktop version (like Lightroom mobile), that would be awesome!

Picktorial offers an easy, fluid, and seamless experience and is much faster than Lightroom, I love the simplicity and intuitivity of the user interface!

Last but not least I compared the results with my until now preferred applications:

RAW file processed in Picktorial

RAW file processed in Iridient Developer

JPEG file processed in Picktorial

RAW file processed in Capture One Pro

RAW file processed in Photo Ninja

JPEG file processed in Lightroom CC

Summarizing the results I can recommend Picktorial as an easy & fast processing tool for those who want to minimise post processing effort & get best possible results w/o a lot of effort

Many thanks for visiting & please leave me a message in case anything is unclear or is you´ve any questions, best regards

Hendrik

I hope this post was helpful / interesting for you - If you like you can support me by sending me a small donation via PayPal.me/hendriximages ! Helps me run this site & keeps the information coming, many thanks in advance!
Want Best Image Quality From Your Fuji ? Here´s How !

After my first try-out of Phase One´s new Capture One Pro v10 (here) I thought those of youse in constant search of getting the very best image quality might be interested in a re-comparison of latest available RAW development solutions ! For this I took a challenging high contrast image shot after dusk - quite scary how much achievable image quality still varies among contemporary RAW converters. Curious ? Please read on !

Great result: XF 18-135mm @18mm f/5.6 1/8" on X-Pro2, developed in Capture One Pro 10

Small side remark: I´m repeatedly amazed about what I can do with Fuji´s XF 18-135mm OIS (Optical Image Stabilization): Apart from replacing a full bag of lenses I´m getting sharp results down to 1/8 sec at any focal length (sometimes even 1/4 sec !) - Hello ... that´s 4-5 stops autonomy vs. non OIS lenses ! Means I could take the above image of a museum venue after dusk at ISO 3200, f5.6 and 1/8 sec hand held !

Ok, so before looking at the various RAW converters I´d first like to share the SOOC JPEG taken with Acros-R film profile - a bit too dark for my taste:

Original SOOC JPEG, using ACROS-R film profile - too dark IMO !

I compared following RAW converters (in order of preference):

Disclaimer: I am not affiliated with any of the above software providers, nor a "fan-boy" of any one of them - I just choose the best solution for my type of images and workflow. However I excluded some RAW developers (Raw Therapee, Silkypix, ACDSee, Aperture, ...) from this comparison as these either were not available to me, or not compatible with Mac OS Sierra, or having an IMO too complex user interface (eg. Silkypix). So, in case you don´t agree to my conclusions you´re most welcome to leave me a comment and/or suggestions below !

Basically I aimed for maximum highlight recovery and dynamic range, covering all zones from pure black to white with balanced gradations of grey in between. I further tried to prevent over sharpening (to which Fuji X-Trans files do not agree too well). Below you can see 200% crops of results achieved with each RAW converter (arranged in order of my personal preference):

My Conclusions:

  1. Overall Capture One Pro 10 delivers IMO the most balanced result, with good contrast and sharpness in the background billboard text and not too aggressive rendering of the grass and the hedge. Capture One now automatically corrects distortion (often prevalent on zooms) by straightening & cropping. However, left at 100% this correction effectively reduces the FF equ. widest angle of view of the XF 18-135 from 27mm to 28.5mm. So I reduce the auto-correction to around 60% allowing me to retain around 28mm FF equ. max. field of view while still getting reasonably straight lines
  2. Photo Ninja brings out more contrast in the text but IMO renders the tree, grass and hedge too aggressively. The image also seems to be overlaid by a visible grain structure. Unfortunately Photo Ninja doesn't´t offer lens correction based on embedded EXIF data and delivers somewhat strange colours (for those into colour imaging)
  3. Lightroom CC delivers reasonable results, albeit with subdued sharpness in the text (with optimal settings for Fuji X-Trans) and a hint of detail smearing artefacts in the foliage
  4. Iridient  (my previous favourite, before trying the newest version of Capture One) disappointed me on this image: I couldn't get sufficient contrast in the text and finest details in that text do not seem to be resolved well enough (lines in the letters break up). Also here IMO too aggressive rendering of the grass & foliage
  5. Affinity Photo delivers a similar balanced result to Capture One but clearly lacks contrast, sharpness and detail rendering in the fine details of the background text
  6. The SOOC JPEG is IMO the least attractive of these (apart from being too dark). This confirms that JPEG´s, while being good enough for sharing images on social media / web are insufficient for big fine-art enlargements - see how the fine details in the text are lost ...

Another aspect to consider is that from my point of view only 2 solutions of the above offer a complete all-in-one image management / RAW development solution: Capture One Pro and Lightroom CC. The others are usually applied as external RAW converters integrated into a Lightroom workflow, requiring exporting and re-importing of images & more complicated handling

Even Capture One is currently my preferred image management solution it has one big deficiency: It is the only software of the above NOT able to handle compressed Fuji RAW´s. This means each RAW file blocks approx. 50mB of your disk space vs. the approx. 25mB per compressed RAW !

Ok, this will be my last post of this year. I sincerely hope you enjoyed visiting my blog during the past year & will continue to follow me thru 2017 ! As always please leave me any comments and/or questions you may have in the comments area, many thanks for your continued support & for your interest / contributions !

Wishing y´all a wonderful, successful, fun new year 2017 & the best of luck for all your (photographic ;-) endeavours, 

Yours, 

Hendrik
 

I hope you enjoyed reading this post - If you like you can support me by sending me a small donation via PayPal.me/hendriximages ! Helps me run this site & keeps the information coming, many thanks in advance !

Capture ONE Pro 10 for Fuji - A First Look !

When I jumped ship from CaNikon to Fuji a couple years ago I didn't find ANY integrated RAW converter / image management solution able to deliver the full potential outta Fuji´s unique X-Trans sensor. Only way out was to use a standalone external RAW converter (eg. Iridient) requiring a 2 step workflow. Then, earlier this year Adobe launched a major Lightroom CC upgrade delivering results very close to the till then Best-in-Class RAW converter Iridient (see my comparison here). Finally on December ONE Phase ONE launched Capture ONE Pro, version ONE-O. Hey, with so many ONE´s popping up I thought I´d take a look and see, please read on for my initial impressions !

Street in the winter sun, captured by Fuji XF 23 mm f/2 WR on X-Pro 2, developed in CO Pro 10

I decided to try out the newest version 10 of Capture One Pro after being intrigued by Thomas Fitzgerald´s excellent blog post describing latest improvements & features, please go here to discover them ! For me the above image has a wonderful glow to it and it took me only a couple minutes to get there - impressive how fast & easy I could get a really good result ! Furthermore Capture One Pro allows me to change any parameter at any time in its logical and clear dashboard (see left side of the screen grab shown below):

Capture One Pro 10 User Interface with logically grouped intuitive setting panels

What I liked most was the fluid interaction between Exposure, Levels, Curve, High Dynamic Range and Clarity settings. In contrast Lightroom IMO has a more linear (chronological) workflow which feels less intuitive and kinda "old fashioned" ...

Concluding, the PRO´s of Capture One Pro 10:

  • Great results. At least at a first glance I couldn't detect any disadvantages vs. my previous favorite Iridient in eg. highlight/shadow recovery, color rendering, detail rendering, sharpening, noise, etc (but I´ll come back here with a more detailed comparison soon)
  • Lens optimization finally working (incl. purple de-fringing !) - this was missing in previous versions of Capture One Pro
  • Fluid, logical and intuitive user interface allowing changing of all parameters in any order
  • NO more external standalone RAW converter needed ! Capture One Pro combines RAW conversion and image management. Strictly speaking this is no advantage over Lightroom

And the CON´s:

  • Capture One Pro 10 can´t read Fuji´s compressed RAW´s (yet). Now this one is really a bummer for me coz Fuji´s uncompressed RAW´s eat up memory at twice the rate compared to the compressed RAW´s (50 vs. 25 mB a pop !). C´mon, Phase One, give us the compressed RAW reading capability, you can do it !
  • Pricey - nearly 300 US$ ain´t a bargin (even though you get a lot for it). Ok I have a CO Pro 8 license so it´ll cost me 105 US$ to upgrade. Still a lot ... but at least it ain´t a subscription rip-off like CC (if you can live without Photoshop CC that is)

Here another "glowing" Capture One Pro image:

Contre Jour in the park, seen with Fuji XF 23 mm f/2 WR on Fuji X-Pro2, developed in CO Pro 10

If you have any questions or would like any advice, please leave me a message in the comments section or on my contact page ! Many thanks for your kind support, interest, liking & sharing ! Herewith wishing y´all a lot of fun trying out Capture One Pro 10 ! Enjoy your December holiday season, all the very best & good luck !

Yours, Hendrik

I hope you enjoyed reading this post - If you like you can support me by sending me a small donation via PayPal.me/hendriximages ! Helps me run this site & keeps the information coming, many thanks in advance !

How to Get Best Image Quality Out of Fuji X-Trans III RAW´s

Hey I got something for those of youse who REALLY wanna get the very best possible image quality out of Fuji´s new X-Trans III image sensor (as currently used on Fuji´s X-Pro 2 and X-T2 mirrorless APS-C cameras). Yeah I know ... Said some posts ago that Lightroom´s all you´ll need ... Basically that still holds true but it all depends on what you expect from your photography, please read on to discover how:

Portrait of my lovely wife: Fuji X-Pro 2 with 35 mm f2 WR @f2.8 1/125 sec

Portraits seem to present quite a challenge regarding image quality (apart from the obvious challenge to capture the right facial expression reflecting persona & character of your model ;-) ! Working on a portrait series I discovered that different RAW developers produced subtle variations in the results. So I thought I´d share them here, starting off as baseline with Fuji´s very good SOOC JPEG rendering. This already delivers an overall pleasing result, however finest details are lost during in-camera conversion:

SOOC JPEG using Fuji X-Pro 2´s X-Trans III 24 mp sensor

Then I tried RAW conversion using Affinity Photo, a relatively new kid on the block (many thanks to The Lightweight Photographer for pointing me to it !). With this one I do get a very nice contrast, which I initially liked a lot (for me nearly the most pleasing off the bat). But on closer scrutiny I discovered it dissolves finer details even more than the JPEG and also produces some unwanted artefacts (see the line between the cornea and the lower eyelid):

RAW conversion using Affinity Photo

This is not the case with Adobe´s latest version of Lightroom CC. Better fine details than the JPEG´s and a fully integrated workflow to boot (no external RAW converter, so no additional exporting / importing needed). However ACR does seem to slightly exaggerate high contrast fine detail - the eyelashes seem to look a bit thicker / heavier than perceived (I learnt a lot from Thomas Fitzgerald´s excellent X-Trans guides & used one of his sharpening presets, they´re really good !). To further optimize this I may need to experiment a bit more in detail with the sharpening settings:

RAW conversion using Adobe Camera RAW in Lightroom CC

Last but not least the most balanced high quality result came out of Iridient Developer: Extremely fine details are retained and beautifully rendered (using default "Iridient Reveal" sharpening). No artefacts, no exaggeration, IMO the very best result I could achieve (with a reasonable effort - I really want to minimize the time spent in front of my Mac, of course ;-)

RAW conversion using Iridient Developer

Concluding I have to say that Fuji shooters have a lot of choices nowadays: Need a fast result w/o hassle ? You can use the SOOC JPEG´s without any problem, they´re amazing ! Want to go RAW for a really good result with an integrated workflow ? Lightroom CC ain´t gonna disappoint you ! But if you want the very best image quality & don't shy away from some extra workflow integration ? Use Lightroom CC for image management and Iridient for RAW conversion (it can be easily integrated into your workflow - excellent "how to" advice available here)

Hope y´all liked today´s post & could find some guidance & information for your own work ? If you´ve any questions, comments or ideas - please leave me a note in the comments section or on my "Contact" page ! Many thanks for reading, for your continued interest & support, and hope to see you here again soon !

Good luck & best regards,

Hendrik

I hope you enjoyed reading this post - If you like you can support me by sending me a small donation via PayPal.me/hendriximages ! Helps me run this site & keeps the information coming, many thanks in advance !

Adobe´s got the best RAW converter for Fuji X-Trans, Part 2 & Conclusion

Last week I shared with y´all how various RAW converters render the Fuji X-Pro2´s new X-Trans III sensor´s hi-lights & shadows, see here. Now for the second (and last) part, I´m looking at details & sharpening - I must say, very interesting ! Please read on if curious - again I start with the SOOC JPEG, showing how the camera interpreted the scene:

 Park with Lake - Fuji X-Pro2, WR 35mm/f2, JPEG SOOC: not bad at all, but a bit too dark !

Here an enlarged portion of this SOOC image:

Crop of above SOOC JPEG, observe some "watercolor" artifacts in the background bushes !

Serves me right, at this extreme magnification level (300-400%) I managed to identify the famous "watercolor" effect in some areas of finest low contrast foliage detail ! Now this is a special feature of Fuji´s X-Trans sensors, developed to punish "pixel peepers" ;-)

Believe me, if you focus your photography on developing the best image content, rather than searching for artifacts at crazy magnifications you'll never need to bother about it. This effect is definitely NOT visible at normal viewing magnifications, nor in print ! As this "watercolor" effect remained visible with all RAW converters, I believe it´s caused on pixel level by interference between finest details and Fuji´s proprietary demosaicing pattern (designed to maximize sharpness by not needing an AA filter for moiré prevention). I also get the impression that it´s less evident on Fuji´s new 24 mp sensor compared to the previous 16 mp sensors (where i could make it visible already at lower magnifications)

Having said that now let´s look at how the different RAW converters perform on details & sharpness:

1. Photo Ninja:

Apart from the missing lens correction the "watercolor" effect is less prominent as it´s masked by a kind of "smearing":

Park with Lake - Fuji X-Pro2, WR 35mm/f2, RAW developed in Photo Ninja

Here the enlargement, showing quite good details & sharpening, but for my taste too harsh micro-contrast ...

Crop of the above Photo Ninja rendering, less visible "watercolor" but harsh micro-contrast

2. Iridient Developer:

From my point of view detail & sharpening are better balanced here (less "smearing") & better sharpening in contrasty details:

Park with Lake - Fuji X-Pro2, WR 35mm/f2, RAW developed in Iridient Developer

See here the enlargement:

Crop of the above Iridient rendering, excellent details & more balanced sharpening

3. Adobe Camera RAW (included in Lightroom & Photoshop):

Last but not least here the rendering of Adobe Camera Raw, with some tweaking of sharpening in Lightroom nearly as good as Iridient !

Park with Lake - Fuji X-Pro2, WR 35mm/f2, RAW developed in Adobe Camera Raw

Details, see here:

Crop of the above Adobe Camera Raw rendering, nearly as good as Iridient !

Conclusion:

From my point of view based on detail & sharpening alone Iridient wins, but with some tweaking Adobe Camera Raw can come quite close !

So, overall combing this with last week´s conclusion I´m gonna try "survive" ;-) without an external RAW developer (i.e. see if I can limit myself to just Lightroom) !

Will keep y´all posted, please feel free to visit me here soon & see how it "develops" (pun intended !)

Many thanks for looking by & for your interest, please feel free to contact me via my contact page & drop me a message, I´ll be most happy to answer your questions as good as I can !

Best regards & wish great imagin(in)g !

Hendrik

I hope you enjoyed reading this post - If you like you can support me by sending me a small donation via PayPal.me/hendriximages ! Helps me run this site & keeps the information coming, many thanks in advance !

Adobe´s got the best RAW converter for Fuji X-Trans now, or what ? Part 1

Recently I got this pop-up on my MAC informing on new Creative Cloud App updates, so I downloaded ´em & was looking at some high contrast images after import using Lightroom´s ACR (Adobe Camera RAW). Here FYI the JPEG SOOC, with totally jacked highlights & shadows:

Dogging the Fountain - Fuji X-Pro2, WR 35mm/f2, JPEG SOOC: Jacked highlights & shadows !

But when opening the RAW´s with ACR - what the ... ??? ;-) Hey, could it be that Adobe´s now finally gotten their Fuji X-Trans rendering act together ? Intrigued by this performance I decided to (again ... yawn ;-) compare Adobe´s Camera RAW (included in Lightroom & Photoshop CC) with the best external RAW converters out there (Iridient & Photo Ninja) - ya just gotta keep on your toes here ;-) please read on if interested !

I´ve been using Photo Mechanic for culling / key-wording & Lightroom for (mobile) image management / processing since way back, so obviously a built in RAW converter would have major advantages for my workflow compared to an external one (no more needing to export & copy back in, nor splitting image processing over 2 bits of software, etc.)

I´m posting this in 2 instalments: 1. Highlights & Shadows Performance (this post), and 2. Detail & Sharpening (coming up soon !)

Let´s start with Highlights & Shadows Performance. Although aesthetically the SOOC JPEG quite faithfully rendered what I´d originally visualised at time of capture the highlights & shadows are like totally blown out. So I was interested how much detail I could pull back into the image during post processing:

To do this I basically first maxed out the highlights recovery and then pushed the shadows by slightly increasing exposure until just before the highlights started blowing out again (thereby keeping an eye on not losing too much contrast). See below the comparison & results !

1. Adobe Camera RAW in Photoshop CC:

This one I liked the most:

Highlight & Shadows compression using Photoshop CC´s built in ACR RAW converter

Dunno why, but i seemed to get a slightly better rendering outta Photoshop´s built in version of ACR than LR´s (maybe the PS ACR interface is better, or I was too dumb or lazy to get 100% the same result with Lightroom´s built in ACR ...). Here a 100% crop view showing vastly improved shadows & highlights areas vs. the JPEG:

100% Crop of Photoshop´s ACR rendering

2. Adobe Canera RAW in Lightroom CC:

Nearly as good (yeah, right - both platforms use the same Adobe Camera RAW built in RAW converter):

Highlight & Shadows compression using Lightroom CC´s built in ACR RAW converter

Here a 100% crop view showing the improved shadows & highlights areas, with slightly less contrast in the shadows whereas highlights seem to have a bit more detail ...

100% Crop of Lightroom´s ACR rendering

3. Iridient Developer:

Iridient is amazing in its ability to bring out detail with a unique & careful sharpening of Fuji X-Pro2´s files, but I was quite shocked to see that its highlight & shadows detail recovery seems to be limited:

Highlight & Shadows compression using Iridient´s external RAW converter

Compared to ACR the highlight head room is quite limited, meaning I have less "foot" room available for pushing the shadows, before the highlights blow (compare the crack between the tiles on bottom right with the ACR versions):

100% Crop of Iridient´s rendering

4. Photo Ninja:

This one I liked the least - highlight head room seems a bit better than Iridient, but didn't matter what I did, i just couldn't manage to bring out more shadow detail (it always kinda remained a dark soup). Also Photo Ninja does not react on EXIF lens correction parameters, you get the total image (see the additional details at the image borders), but the image is still distorted:

Highlight & Shadows compression using Photo Ninja´s external RAW converter

And here the details - highlights OK´ish but the black dog just remains a black silhouette:

100% Crop of Photo Ninja´s rendering

Sorry, did´t have no more access to Capture One & never used Raw Therapee so those two are not covered here ...

Interim Conclusion: Adobe´s ACR wins the dynamic range battle !
(please also check out part 2 soon for details & sharpness comparison and for the final conclusion)

From a highlights & shadows recovery point of view the benefit of not needing to use external RAW converters seems to be an achievable target, Adobe´s ACR is doing an excellent job here ! OK I´d not push it that far for a fine art print to preserve the visual impression of the original situation, but good to know there is room for manoeuvring !

I hope this was an interesting read for all you Fuji fans out there - please leave me a comment in case you´ve any questions and/or suggestions ! Many thanks for looking by & wish y´all good light !

Best regards

Hendrik

I hope you enjoyed reading this post - If you like you can support me by sending me a small donation via PayPal.me/hendriximages ! Helps me run this site & keeps the information coming, many thanks in advance !

WOW ! Combining X-Pro2´s X-Trans III and Iridient

Finally I dunnit - after reading lotsa reviews and years of frustration with windows OS (jeezus, I needed to become more of an IT expert than focussing on improving my photography ...) I jumped ship to Mac. This now opened the door to using Iridient RAW developer (which unfortunately don´t exist for Win users ...). Well to put it mildly, I was completely blown away with the results !!!

Spring coming to Hofgarten in Bayreuth

Gone the issues with smearing foliage or fine details artefacts i´d experienced with various windows based RAW converters off Fuji X-Trans sensors ! Using Iridient´s R-L deconvolution setting with radius 0.5 and 30 iterations I get a clear but subtle sharpening effect w/o visible artefacts, demonstrating the amazing details Fuji´s new 24 MP X-Trans III sensor is capable of rendering. I still use Lightroom for my image management (yeah, some old habits die hard ;-) but using LR proprietary RAW converter just don´t cut it, see below:

Iridient RAW development - nice & crisp !

LR RAW development - still a bit mushy ...

To integrate Iridient RAW developer into Lightroom I set up:

  1. LR to use Iridient as external RAW editor: LR export menu > export to same folder as original, add to catalog & stack, TIFF, after export open in Iridient ...
  2. Iridient to open the original RAW image (not the TIFF copy !): Preferences > tick "Find & Load RAW for TIFF, JPEG, ... open events"

White fence in the last afternoon sun ...

When exporting an image from LR to Iridient (right click > export to Iridient) LR creates a "place-holder" TIFF from the RAW image but Iridient opens and develops the original RAW file related to it. When done in Iridient the developed RAW overwrites the TIFF "place-holder" in LR by using file > process image and overwrite option. Then back in LR just apply some finishing touches (B&W conversion, curves, exposure, contrast, highlight / shadow recovery, etc) and you´re done !

Candlelight dinner with my lovely wife (no flash !)

I hope y´all liked this post & could get some inspiration off it - my apologies to my readers & followers that I´ve neglected my blog for a several months: moving house & starting up new job and all ...

Please let me know if you got questions or need any support in how to set up the various bits of software so this works smoothly and/or which settings to apply for  best results (but on that one I´m still on a learning curve m´self, so please bear with me a little while ;-)

Many thanks for reading & look forward to hearing from you, appreciate if you´d leave your comments or constructive critique in the comments window below or drop me a mail !

Thanks in advance & warm regards

Hendrik

I hope you enjoyed reading this post - If you like you can support me by sending me a small donation via PayPal.me/hendriximages ! Helps me run this site & keeps the information coming, many thanks in advance !

TWO of a Kind !

OK, So it's been quite a time since my last blog post - my sincere excuses to those who have been eagerly waiting for news ;-) ! I was quite busy & couldn't spend as much time on my blog as I'd have wanted to, still, I hope y'all will enjoy this post about looking for & finding pairs of things - "TWO of a Kind !"

Two Funnels

I like the symmetry of this image, broken by the vertical shadow on the wall and the random nature of the clouds. Also the vertical lining of the clouds contrasts nicely with the horizontal wall panels. I further abstracted the image by pointing the camera nearly straight up, making the normally vertical funnels look as if they're lying down. I always look for such conflicting elements to bring tension into my images, here's another example:

Two Pillars

Two vertical columns in the Botanical Gardens of Villa Melzi in Bellagio, Lake Como (be sure to take a look if you should be in that area - really worthwhile and very relaxing !). Looks like the shorter pillar just got some help from the vertical cloud formation on the top right !

The image below was captured on the terrace of a hotel with lemon trees, where some of the lemons had fallen off & I could take the image before the personnel had a chance to remove 'em !

Two Lemons

Here the round shapes of the fruit and the ashtray in the back are nicely contrasted by the regular pattern of the wicker table !

For those interested all images were taken on Fuji X100S and Fuji X100T cameras and the resulting RAW files developed in Photo Ninja, subsequently fine tuned in Lightroom.

Hope y'all liked my post ! As always your comments, constructive critique and questions about the images, technique, gear are most welcome ! Just drop me a message on my contact page or send me your comment below ! Many thanks in advance & wish y'all a great Sunday, best regards,

Hendrik

I hope you enjoyed reading this post - If you like you can support me by sending me a small donation via PayPal.me/hendriximages ! Helps me run this site & keeps the information coming, many thanks in advance !

X100T = View FINDER !

My Fuji X100T's OVF (Opical View Finder) does exactly that: It FINDS VIEWS ! Like the view below thru an arch in the ancient town of Pescia in Tuscany, Italy:

Pescia, Tuscany - View thru arch

Sure, you can precisely preview your image on a digital camera's LCD screen or thru the lens of a DSLR, but I prefer the superior clarity and brightness of the X100T's optical viewfinder, which intuitively helps me to frame the part of the scene I wanted to show:

Barred Window

 In fact this is one of the main reasons I have chosen to go back & limit myself to this one camera / one lens combo - NO more fussing about equipment and more focus on making the image !

3 Steps to ... Heaven ?

I hope y'all enjoyed today's post - please let me know ! Thanks for visiting & my best wishes for a great weekend, best regards,

Hendrik

I hope you enjoyed reading this post - If you like you can support me by sending me a small donation via PayPal.me/hendriximages ! Helps me run this site & keeps the information coming, many thanks in advance !

INTO the Light !

Here in Europe we have them: Seasons, the cyclic changing of nature’s weather, temperatures, colors, … and Light ! After the dark, wet and cold of winter it’s great to enjoy the warmth & light of the sun’s spring rays … that’s what I’ve tried to capture in these images:

Terrace of VIlla Sermolli in Buggiano Castello, Tuscany

Lovely, how the afternoon Tuscan sun lights up the first spring blossoms and breathes life into the weathered terrace of the gorgeous 16th century Villa Sermolli and overgrown backyards of Buggiano Castello, Tuscany:

Overgrown Backyard in Buggiano Castello, Tuscany

The good thing about spring is that the light’s still coming in low during the day, allowing it to better sculpt textures and shapes on otherwise unremarkable subjects, like this back alley in Montecatini Terme:


Below diffused lighting after sundown highlights the white marble of the fountain, while the water turns inky black from the reflection of the dark evening sky !

Back Alley in Montecatini Terme, Tuscany

Fountain after Sundown

For those interested, all this was shot using the amazing Fujifilm X100T; Always with me, never in my way, delivering fantastic rendering and image quality, THANKS Fuji !

Post processing: No cropping, RAW development using Photo Ninja and some contrast enhancement using Tone curve in Lightroom ...

I just never cease to be amazed by the dynamic range & highlight headroom of the Fuji X-Trans sensor !

So, I hope y'all enjoyed this week's blog post, many thanks for visiting & reading – As always your comments & constructive critique are most welcome and appreciated, thanks in advance & best regards

Hendrik

I hope you enjoyed reading this post - If you like you can support me by sending me a small donation via PayPal.me/hendriximages ! Helps me run this site & keeps the information coming, many thanks in advance !

NO Time & Your Images SUCK ?

Recognize this ? You're stuck in the rat race of your day (and night) job, and/or your agenda’s jacked with back-to-back assignments – all maybe good for the biz, but …

Somehow your creativity seems to haven gotten lost along the way, and the lighthearted joy of creating what YOU fancy has meanwhile become a long forgotten memory - Your images SUCK. Big time !

Afternoon Sun's Shadows

And ... you unfortunately don’t have the opportunity to make them more interesting by going exotic places to take photographs ... :-) ? Today I'd like to share what worked for me:

Look around & experiment ! Often the beautiful effects of light are right there, in front of your eyes (while you were too preoccupied with dreaming of those far away locations) !

In my case it was the light of the afternoon sun passing thru the regular geometric shapes of the metal grille outside our window, creating distorted shadows on the uneven folds of our curtains ...

A Different Perspective ...

RAW processing in Photo Ninja preserved the highlights. Then I went B&W in Lightroom & only manipulated the curves a bit (the tonality curves of course, not the curtain's ;-) ... The result’s quite interesting, don't you think ?

Your constructive critique & comments are, as always, most welcome ! Looking forward to hearing your view - thanks for reading, take care & best regards,

Hendrik

I hope you enjoyed reading this post - If you like you can support me by sending me a small donation via PayPal.me/hendriximages ! Helps me run this site & keeps the information coming, many thanks in advance !

Taming the Beast ! X-Trans RAW, Part 2

You liked PART 1 ? Already curious about PART 2 ? OK, as promised last week today I would like to follow up with PART 2 of my X-Trans RAW converter evaluation by sharing ALL the results - wish y'all an interesting read, please check it out below !

Behind the House ...

But in order to allow easy comparison, I've used the same RAW image as last week, a house façade in Buitrago del Lozoya in Spain ...

the following 4 main X-Trans RAW converter (Windows only) options were analysed:

  1. Picture Code’s Photo Ninja 1.2.4, with post processing in Lightroom
  2. Phase One’s Capture One Pro 8.1.1 (all-in-one solution)
  3. Adobe’s Lightroom 5.7, with embedded ACR (all-in-one solution)
  4. Silkypix’s Raw File Converter EX 3.2.22, with post processing in Lightroom

Please see below the results - click on the images below to see an enlarged version:

Photo Ninja

LIghtroom

Capture One Pro

Silkypix

And here (finally ;-) the detailed evaluation of the various (windows only) RAW converters & post processing (if needed):

1. Photo Ninja & post processing in Lightroom:
Delivers the best detail & highlight recovery, but colors are difficult to manage & a bit more noise reduction is needed in LR (details, please see my previous Post here and integrated Photo Ninja / Lightroom workflow here):

2. Capture One Pro:
More natural colors (less corrections needed) but vs. PN less sharp detail rendering & less highlight recovery, see "Capture One Crop 1". Don't need additional noise reduction, but tendency to show conversion artifacts (see door bell panel in "Capture One Crop 3"). Advantage is the "All inclusive" integrated workflow !

3. Lightroom (using built in Adobe Camera RAW converter):
Main issue here, from my point of view is still the well know "smearing effect" (albeit better than previous versions) and lower detail rendering, see "Lightroom Crop 1". Like Capture One also this one has an "All inclusive" integrated workflow !

4. Silkypix & post processing in Lightroom:
Also here less highlight recovery and lower detail rendering, see Silkypix detailed crops. Apart from this Silkypix from my point of view has a complicated user interface which needs some getting used to ...

Photo Ninja Crop 1

Capture One Crop 1

Lightroom Crop 1

Silkypix Crop 1

Photo Ninja Crop 2

Photo Ninja Crop 3

Capture One Crop 2

Capture One Crop 3

Lightroom Crop 2

Lightroom Crop 3

Silkypix Crop 2

Silkypix Crop 3

As you can see (recapping my last week's conclusion in PART 1 of this evaluation), from my point of view Photo Ninja has the best detail rendering and highlight recovery potential, followed by Capture One Pro, Lightroom and Silkypix !

But I'm sure some of you out there will come to different conclusions, better fitting & optimized for your way of working, so looking forward to an interesting discussion !

Hope you enjoyed the read, please let me know by entering your comments on this page, or by sending me a message via my contact page if you've any questions - I'll be happy to answer them !

many thanks, Hendrik

I hope you enjoyed reading this post - If you like you can support me by sending me a small donation via PayPal.me/hendriximages ! Helps me run this site & keeps the information coming, many thanks in advance !