#camera settings

All You Need is LoVe ... for the X100V!

V”, as in X100V and by the way it’s the 3rd letter in the word “LoVe”! Now it ain’t my intention to try explain what love is here, so let’s just head over to Merriam Webster (dictionary). They got a fitting definition I’d like to share with y’all: Love is … “a strong affection for another arising out of kinship or personal ties”. Another? Ok, so in this case it ain’t a person, but it’s the X100V! Please check out my user review, tips & recommended settings below after nearly 4 weeks of extensive use:

Twin lamps’ shadows, captured on Fuji X100F with 23mm F/2 @F/8, 1/350 sec, 160 ISO

See the picture above? Somehow I never seem to find that kind of images (or should I say the image found me? ;-) when using my exchangeable lens cameras (X-Pro2, X-H1, GFX 50R, etc.) … Maybe it’s the increased creativity spawned by the X100V’s limitation to one lens only or its smallness & unobtrusiveness? Whatever. Look at the image below, another example. OK, I do concede this kinda images don’t qualify as artistic masterpieces by any measure, but they do elicit a strong emotion in me, which most of my other, documentary style photography don’t. It’s somehow got something to do with how the X100 series cameras influence my approach to photography: These little cameras make you want to try out new things. Their fixed focal length animates you to experiment with light & shadows, perspective & point of view, rather than fussing around with focal lengths. You start to intensely feel the world around you, rather than just taking pictures of it. The whole experience is similar to the impressionist painting style: Impressionists like Claude Monet, or Pierre-Auguste Renoir are known for their flurried brushstrokes, they paint the scene as if they had only glanced at it for a moment. It’s just a quick, spontaneous “impression”. That spontaneity is also the core attribute that justifies the X100 series’ value for me! Below another surreal motif which captured my fancy. It’s defined by the stark contrast of the puddle’s inky blackness vs. the bright white pillars - looks like the black puddle is “leaking” from those pillars:

Pillar puddle, seen by Fuji X100V with 23mm F/2 @F/8, 1/80 sec, 200 ISO, -1 EV

Fuji’s original X100 launched in Feb 2011. It went on to become a game changer in the world of photography, mainly due to its promise of “A compact take-everywhere-with-you camera with pro-level image quality output”. Despite its undeniable (retro) charm it did however have several quirks and bugs, many of which were subsequently solved by numerous firmware updates. Since then Fuji has also launched several camera upgrades, all of which have since accompanied me for parts of my photographic life, building the aforementioned “kinship” & “personal ties” in my opening “Love” statement: After the initial X100 came the X100S = “second”, X100T = “third”, X100F = “fourth” and now, after 9 years Fuji’s fifth iteration called X100V is here (the Roman numeral “V” indicating the “fifth”)

Below night image benefitted from using the X100V’s tilting rear LCD screen. I could unobtrusively frame the image properly and wait for the right moment before firing the shutter:

Nightly bistro rendezvous, observed by Fuji X100V with 23mm F/2 II @F/2.8, 1/40 sec, 6400 ISO

The X100V is the one, which in my opinion finally fulfils the original X100 model’s promise, due to following 5 major upgrades:

  1. Weather Resistance (provided the lens is protected by a good UV filter attached to the AR-X100 adaptor ring): Finally this gives me the peace of mind to really always have the camera with me & take photos in all conditions (hey, usually that’s when you find the best images!)

  2. Articulating LCD Screen: Finally the LCD screen can be tilted. In combination with the X100V’s fast autofocus this allows me to discreetly & unobtrusively snap quick pictures from the hip while remaining in full control of image composition & lighting (no more guesswork). The slightly lower point of view also results in a more pleasing perspective in people shots. Raise the camera to your eye? People notice immediately & gone is the spontaneity!

  3. Significantly Improved version II Lens: Honestly I was never unhappy with the X100 series’ original 23mm F/2 lens: But it’s definitively no match for the improved 23mm F/2 version II on the X100V! At max. aperture it’s already sharp over the full frame! And there’s no more close focus softness nor weird lens flare patterns around bright highlights

  4. More Intuitive ISO Dial (and user interface in general): This may be a small change technically but it completely transforms the usability, as you can now leave the ISO ring in the lifted (unlocked) position & fluidly change ISO w/o needing to take the camera from your eye!

  5. Beautifully Designed & High Quality Sleek Housing: Ok, so this one don’t really influence your images but the latest iteration of this camera feels so solid & looks so beautiful, especially the silver version - you just can’t put it down anymore & constantly need to take photos … ;-)

There’s one more upgrade which is the slightly higher resolution BSI (Back Side Illuminated) X-Trans IV sensor with 26MP and 160 base ISO vs. the previous 24MP X-Trans III sensor with 200 base ISO. However I can’t really see a big difference here so for me this one don’t really qualify as a substantial upgrade … The new sensor even demonstrates slightly higher noise levels at higher ISO’s, but you really need to look very closely to see the difference, see below example taken at 1600 ISO - still perfectly OK if you ask me:

Grey vase found by Fuji X100V with 23mm F/2 @F/2.8, 1/40 sec, 1600 ISO

Unfortunately there are also 2 “downgrades” compared to the X100F which I’m not so happy about:

1. NO infinity target indicator box in the OVF (Optical ViewFinder) when using “Corrected AF Frame”:

Screenshot 2020-03-22 at 14.57.00.png

This means you lose any indication of where your AF target box will be at distances larger than your current focal position, making AF focussing using the OVF less predictable: No way of knowing to where the AF target box will jump when refocussing from near to far. If you’re at a point A on a map and you don’t know how far away point B is, how’re you supposed to know when you’ve passed 1/3, 1/2 or 2/3 of the distance toward point B? On the X100F the always visible near & far target boxes make it more easier to judge!

2. Missing D-Pad: This is partly mitigated by the ability to use gesture swipes on the rear LCD touch panel

To be fair the X100V’s EVF has a higher resolution compared to the X100F (3.69 mln dots vs. 2.36 mln dots) & it offers a more smooth viewing experience than the EVF on the X100F. Below image was composed by using the EVF (I needed the precise limit of the frame on the right side to exclude a building crane from intruding into the image & I didn’t want to have to crop afterwards … ;-)

Early morning sun on town house façade, Fuji X100V with 23mm F/2 @F/8, 1/680, 320 ISO

OK, so I can live with those lesser downsides. Not to forget there are still 2 big benefits inherent to the X100 series compared to other mirrorless cameras: A super quiet leaf shutter allowing flash sync up to 1/4000 sec shutter speed and a built in (4 stop) ND filter

In overall I gotta say that the above mentioned improvements make the X100V the most significant upgrade of the whole X100 series ever (from my point of view). The X100V finally fulfils the brave promise of Fuji’s original X100: A compact, always with you everywhere camera delivering pro-level image quality. So, how about some images of brick walls to demonstrate that “pro-level image quality”? Sorry, I ain’t a brick wall photographer really. Y’all just gonna have to believe me on that one … the X100V’s new version II lens is phenomenal. Totally rad. Simply awesome! Don’t trust me? No problem, there’s like a million of brick wall photography specialists roaming the net - just head over to them & pixel peep to your heart’s content!

There are some reports on the web about the camera heating up and the manual focus ring making grating noises. While I’ve not experienced the former I did have to exchange my first camera to get one without the grating noise of the manual focus ring …

Summing up I can without any reservations highly recommend the X100V and rate it with ***** (five stars) … It’s ideal for all kinds of documentary & street photography and for social, family and wedding photography I’m sure y’all will have a wonderful & fruitful experience with the X100V. FYI for me the X100V is a “her” coz I got an emotional connection to her & absolutely love shooting with her (her name’s “Irene”, crazy huh? ;-)

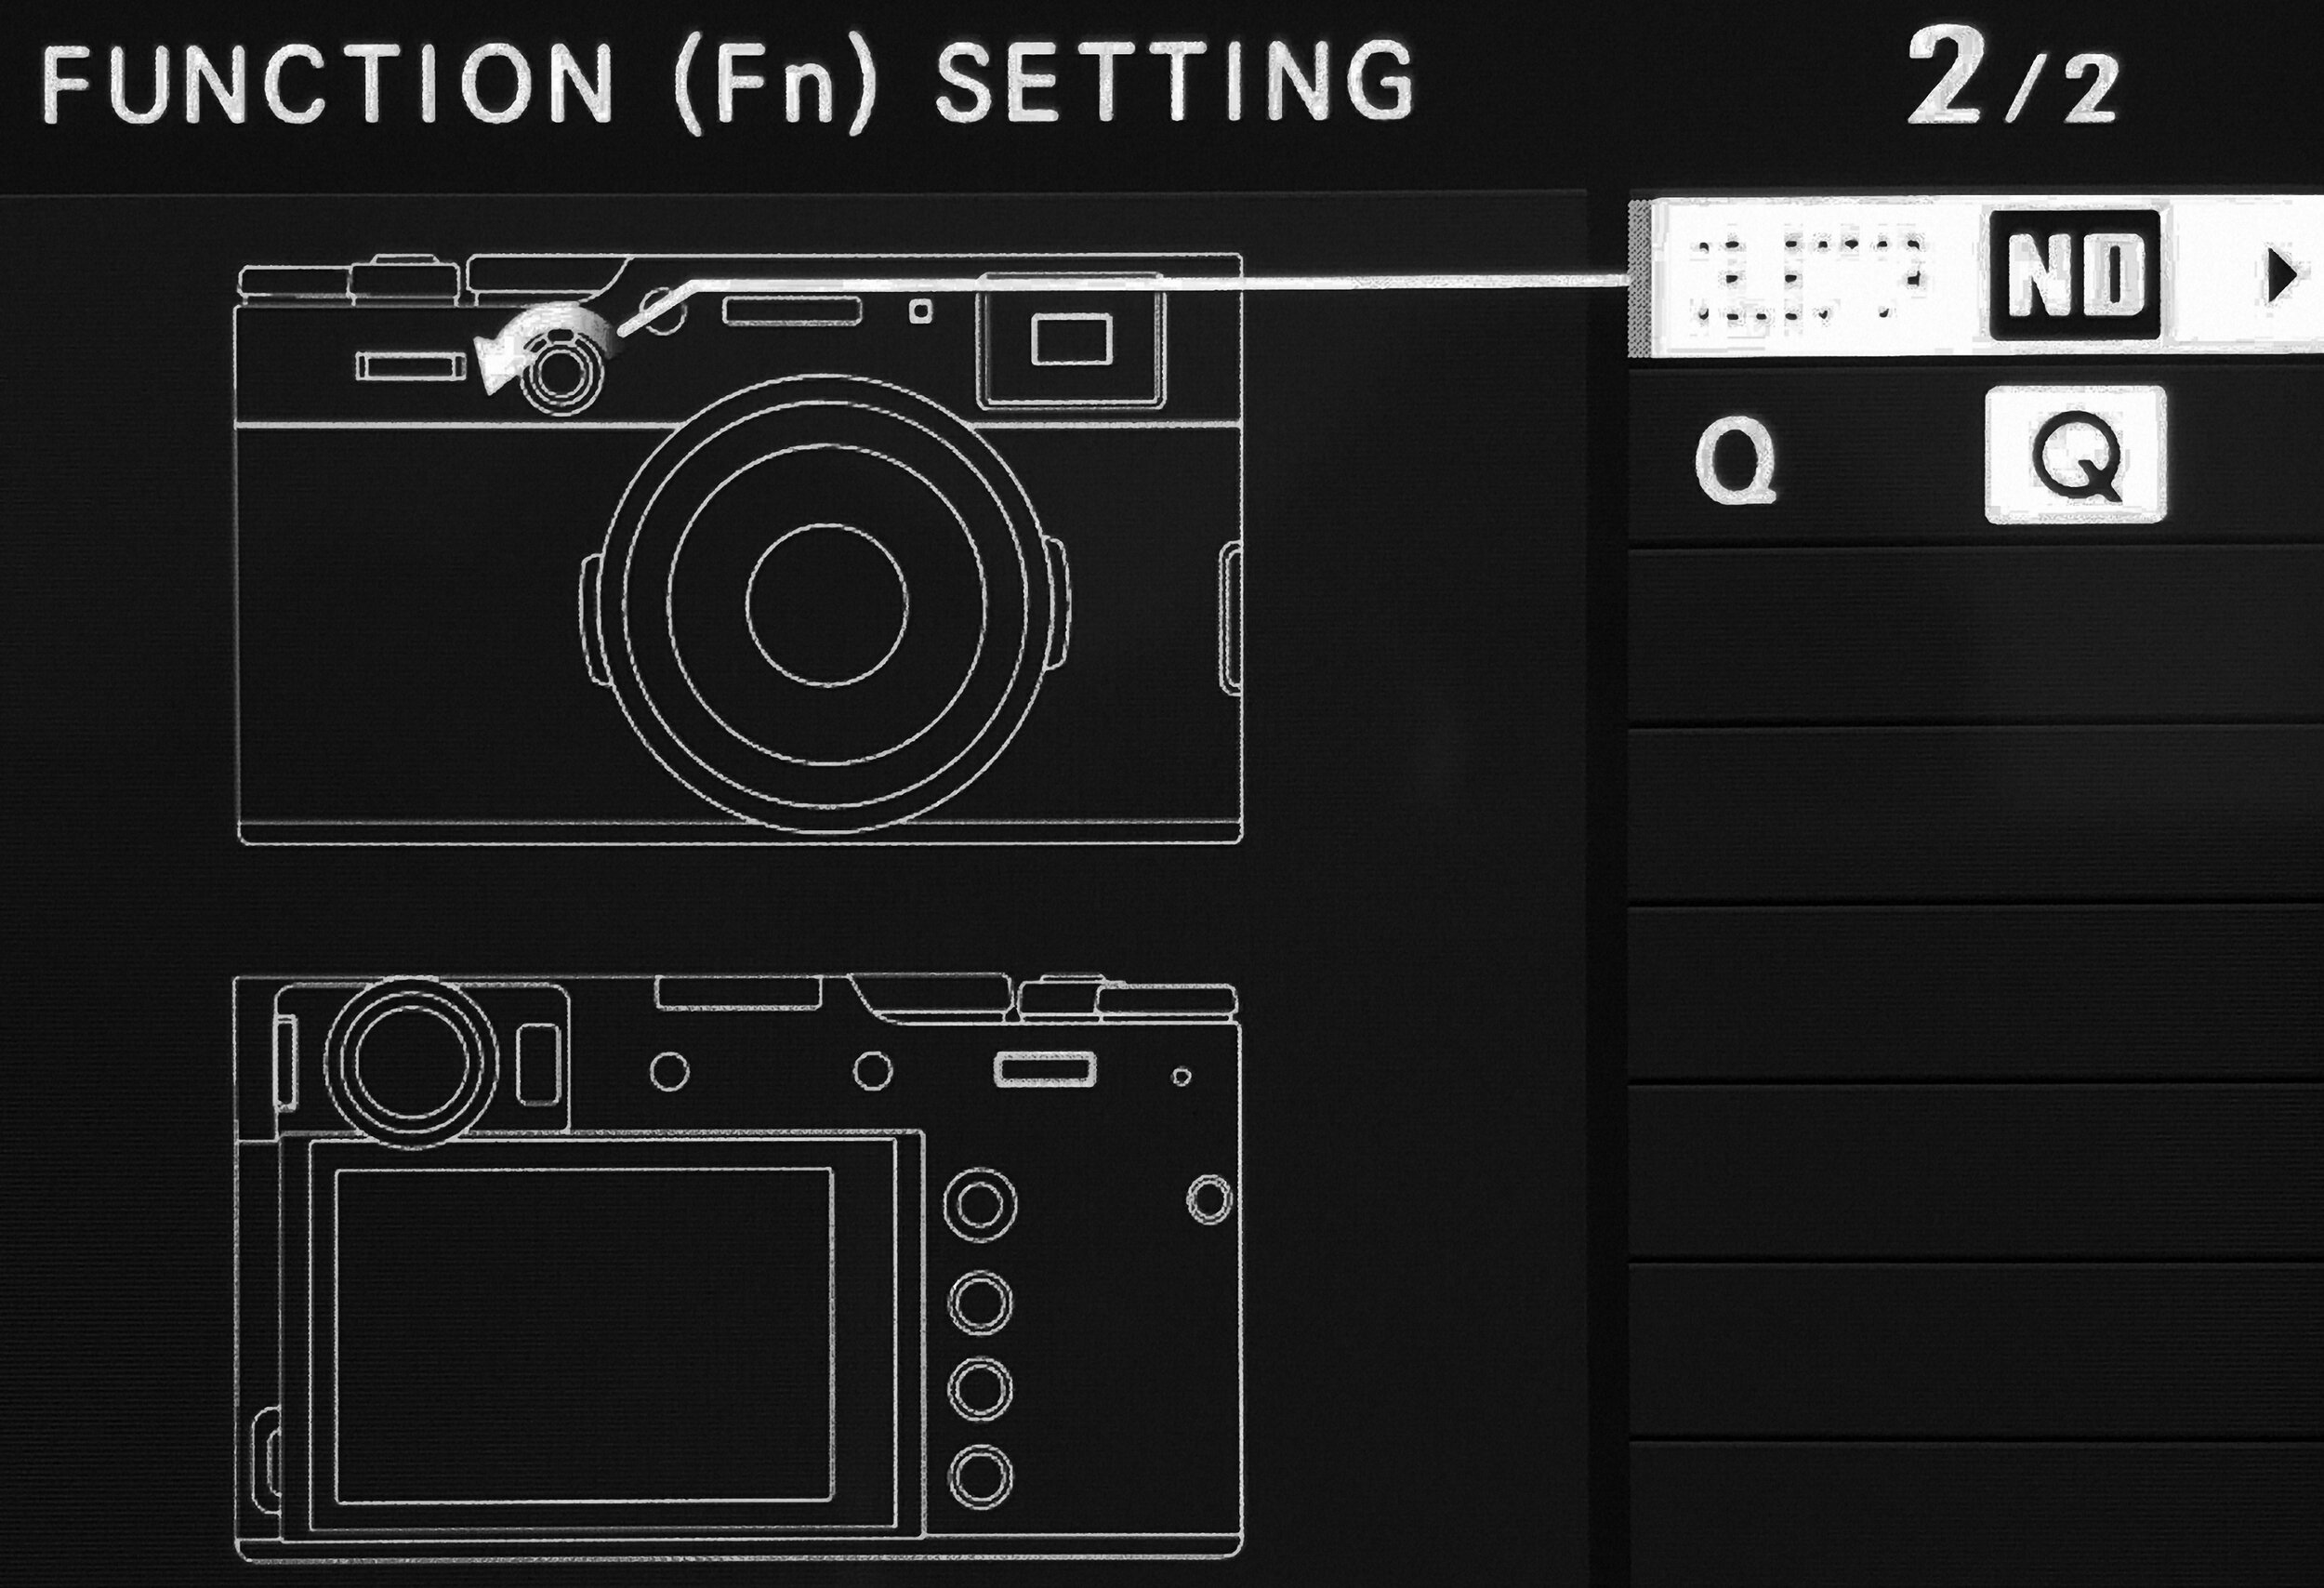
So, before I close this post I’d like to share my preferred personal Fn (function) button allocation with youse (don’t worry, it’s totally for free, kinda like a “bonus”)

These Fn button settings give me a seamless adjustment experience while using the camera, minimising the interference on the image taking process (please excuse the less than perfect image quality of the X100V’s LCD screen off my iPhone, but it’s good enough to see the settings I think):

X100V Fn Allocation 1.jpg
X100V Fn Allocation 2.jpg
  • Fn1 ………… Shutter Type

  • Fn2 ….…….. Face / Eye Detection Setting On/Off

  • T-Fn1 ……… Photometry

  • T-Fn2 …….. ISO Auto Setting

  • T-Fn3 …….. AF Mode

  • T-Fn4 …….. Natural Live View On/Off

  • AELAFL …. AE Lock Only On/Off

  • R-Dial ……. Focus Check (press to Zoom in)

  • Selector … ND Filter (pull to the right & hold for 3 sec to activate)

  • Q …………… Quick Menu

If you have any questions and/or any comments / suggestions please leave me a note in the comments section below or on my “about” page (your email will not be disclosed), I’ll answer every one of your messages!

Many thanks for visiting & reading and hope you enjoyed it! Please take care & stay healthy,

Best regards,

Hendrik

If you like you can support me by sending me a small donation via PayPal.me/hendriximages ! Helps me run this site & keeps the information coming, many thanks in advance!

Into the Light: Look for the Shadows (Fuji ACROS-R Settings)

Shadows. What do they mean? Depends on your point of view & mood: darkness? melancholy? pessimism? Or do they point towards the light, leading the viewer´s eyes to the bright tones in your image, creating an impression of brightness, hope, and optimism? You decide! Use those shadows to manifest the existence of light. Want to learn more? Please read on to find out!

Into the Light, with Fuji X100F, 23mm f/2 @f/2.8, 1/34sec ISO1600 developed in LR CC mobile

Difficult image, this one. Dynamic range clearly exceeds the latitude of the JPEG file, but I wanted the shadows to come in black as ink to strengthen the impression of moving into the light at the end of the corridor. That's why I usually use Fuji´s ACROS film simulation with shadow tone set to +3 (very hard). As some of youse may know I do nearly all my post processing on my iPad Pro on Lightroom CC mobile, using Fuji´s magic ACROS JPEG´s

However, when diving into the corresponding RAW file I can discover a couple more stops of dynamic range in the shadows by dialing down the shadow contrast. But I didn't wanna make ´em visible as this  would've created too much of a HDR effect for my taste. But if y´all interested I could do a follow up post showing how that looks, please leave me a comment below if interested! ;-)

Courtyard doors, Fuji X100F, 23mm f/2 @f/5.6, 1/60sec ISO400 developed in LR CC mobile

Also above image got a shadow tone of +3. Gives me solid black w/o detail between the doors for my trouble. But if I reduce the shadow contrast to 0 or -1 I get a too flat gradation in the door panels. The door panel shadows are too close to black making it difficult to get sufficient contrast separation, so I left the image as I´d originally taken it. Below image is much better balanced:

Table by the window, Fuji X100F, 23mm f/2 @f/5.6, 1/75sec ISO400 developed in LR CC mobile

The table and chairs have a special glow to them, coz I usually use a medium soft highlight tone of -1 which gives me more tonality and flatter gradation in the lighter tones of the image. However you gotta watch it: Don't use -1 or lower highlight tones in images with predominantly lighter tones (eg. with a lot of sky) as the resulting contrast is too flat and you don't get no more pure white. For me the image below´s on the edge in that respect: Contrast in the floorboards and the wall is maybe a touch too flat:

Chinese hallway, Fuji X100F, 23mm f/2 @f/2.8, 1/42sec ISO1600 developed in LR CC mobile

The below image has a broad gradation from black over mid-tones in background to white, nicely bringing out the texture in the wall and the floor:

Chinese doorway, Fuji X100F, 23mm f/2 @f/5.6, 1/220sec ISO400 developed in LR CC mobile

Summarizing my preferred ACROS settings are:

  • ACROS-R (red filter) or ACROS-Y (yellow filter)
  • Dynamic range on Auto or max. 200% (400% flattens gradation too much)
  • Highlight tone -1 or 0, depending on the amount of light tones in the image
  • Shadow tone +3 to deliver those punchy black shadows
  • Noise reduction -3
  • No additional grain (ACROS has an ISO dependent grain built in)
  • Limit ISO to 1600 for architecture & landscapes to limit grain

Hope you enjoyed the read, please let me know your comments or questions below (or leave me a note on my about page), I will be most happy to answer them as soon as possible. Many thanks for visiting, best regards

Hendrik

I hope this post was helpful / interesting for you - If you like you can support me by sending me a small donation via PayPal.me/hendriximages ! Helps me run this site & keeps the information coming, many thanks in advance!

A Merry (Fuji ;-) X-mas: 4 intuitive settings for your Fuji X100F!

Crazy how time flies, again one year has nearly gone by and another new year is just about to start! With this post I just wanted to thank all of youse who’ve visited by blog & put up with my ramblings for your continued support, constructive comments and interesting questions (hopefully all answered). And of course to wish y’all a merry X-mas and lots of fun & success for 2018! In Europe they celebrate the “Advent”, kinda like a countdown of the last 4 Sundays to X-mas, see below image of Advent candles captured with my beloved Fuji X100F (btw also a big thanks to Fuji for that wonderful 23mm lens with that dreamy rendering at f2!)

3 burning, 1 to go: “Advent” countdown to X-mas, Fuji X100F @f2, ACROS JPEG in LR CC mobile

Always got my X100F with me. Never leave home without her. Her name’s “Irene”. I know that’s nuts, but it is like it is. Can’t be changed. No cure. Sorry. S’funny, my X-Pro2 & my X-T2 ain’t got no names. Dunno why, they just no names kinda cameras (or they just haven’t yet grown on me as much as my X100F has to warrant gettin‘ named ;-) OK I gotta ‘fess up here, I got history with the X100 series. And no, I didn’t start with the original X100, like ever’body else seems to have ... For me it was only love at ‘S’econd sight: The X100S was what caused me to jump ship from the LeiCaNikon camp, see here and here. Never looked back since. Didn’t. Ever! After the “S” came the “T” and finally I ended up with the fantastic “F”, see below me & my “Irene” reflected in X-mas decoration ;-)

Me & “Irene” reflected in X-mas deco, Fuji X100F @f2.8, ACROS JPEG in LR CC mobile

Now hear this: Fuji’s X100F has taken the X100 series magic to a whole new level: 24mp X-Trans III sensor, X Processor Pro, and other marketing fluff y‘all can read about ad nauseam in millions of tech reviews all over the web ... But what really counts (next to the lovely 23mm lens, higher resolution, better AF and the amazing ACROS film simulation, etc.) is the result of combining all these features with the X100F‘s highly customizable user interface. This makes the X100F so special & intuitive, enabling it to truly become the proverbial ‘extension of your eye’. It allows you to manifest your vision & perception of the world around you in your images without ever getting in your way. Uncanny. Even people you’re photographing forget about it after a couple seconds (if they even notice it at all, thanks to the super stealthy electronic shutter ;-). So, as a small X-mas treat I’d like to share my favorite user interface settings with y‘all, please read on & enjoy!

Chairs. Infinitely stacked, ACROS JPEG, processed with Lightroom CC mobile

There are 4 settings I want to be able to change real fast, without moving the camera from my eye & without needing to fumble with buttons, menu‘s, etc.: Focus point selection, easy Face / eye detection setting, fast switching flash on or off (incl. its relevant settings) and simple ISO / exposure compensation. Let’s take a look (and you ain’t gonna find the tips in the second & third item anywhere else!):

  • Focus point selection - that’s the easy one, just use the joystick next to the LCD display to move your focus point to right where you want it. No more “focus - recompose” antics!
  • Face / eye detection setting - assign the “face / eye detection” function to the “down” button on the 4 way Controller at the back of the camera, then you can press the “down” button to activate this function and continue pressing “down” to cycle thru all the face / eye detection options all in one fluid motion, neat huh?
  • Switch between flash / without flash operation - assign the “shutter type” function to the “Fn” button on the camera’s top plate and set flash function setting to “ON”, “TTL” and adjust your flash compensation as required (eg. -2/3 EV, for optimal fill flash). If I then want the flash off for normal photography, I cycle the “Fn” button to electronic shutter “ES” and the flash is switched off (no flash operation with electronic shutter). If i come across a scene where I want to apply fill flash at the blink of an eye, I cycle the shutter type back to “MS+ES” (mechanical+electronic shutter) or “MS” (mechanical shutter) using the “Fn” button, which immediately again activates the flash with the preset flash exposure correction (-2/3 EV in this example). Cool!
  • ISO / exposure compensation: Last but not least, setting the exposure compensation dial to “C” and the menu item “button / dial setting“ > “ISO dial setting (A)” to “COMMAND” allows you to use the front command dial to toggle between changing ISO settings (jncl. Auto ISO) and exposure compensation by pressing it and adjusting the respective settings by rotating it. Of course this renders the nice “retro” style ISO-compensation-integrated-into-shutter-speed-dial and the exposure compensation dial redundant, but they still do look good & you can always use ‘em as back-up ;-)

See below a summary of my favorite X100F user interface settings in more detail (Fn button allocations, Q-menu and My Menu settings) for max intuitive operation:

My favorite Fuji X100F user interface settings for max intuitive operation

Of course I’d be most happy to answer any detailed questions you may have (please leave me a note in the comments section below) & wish y’all lots of fun & great images with your Fuji camera, especially also best wishes for the new year. Many thanks for looking by & looking forward to hearing about your experiences!

Best regards & merry (Fuji) X-mas!

Hendrik

I hope this post was helpful / interesting for you - If you like you can support me by sending me a small donation via PayPal.me/hendriximages ! Helps me run this site & keeps the information coming, many thanks in advance!

Capture with Style!

Been some time since I posted ... Was kinda busy movin´ house & couldn't find my camera ;-) Now I´m back with Style! Capture (-ing) with Style, using Capture One Pro 10 with a modified Style (never liked the "canned" stuff, always like to do my own thing!). Please read on to find out more!

Into the Sun, with XF 35/2 WR on X-Pro2, Capture One 10 with modified BW-15 Style

In Capture One Styles are sets of presets driving several adjustments simultaneously, while presets adjust only a single parameter, eg. "grain". Means you can dramatically speed up your post processing workflow by applying such Styles during image import. By selecting a Style suiting your needs you can automatically adjust eg. gradation curve, sharpening, noise reduction, etc. of your images when importing your images into Capture One and you´re already 90% done without lifting a finger!

Bridge in the Park, with XF 35/2 on X-Pro2, Capture One 10 with modified BW-15 Style

As already mentioned here my favorite Capture One Style is the BW-15 (grain) black & white Style, which IMO comes closest to Fuji´s amazing ACROS JPEG film simulation. But the grain´s too much salt in my soup and the default sharpening settings seem a bit too aggressive. So I was trawling (not trolling, mind you ;-) the net for optimal Capture One settings in combinmation with Fuji´s 24mp X-Trans III RAW files & stumbled across Thomas Fitzgerald´s "X-Trans-Files-in-Capture-One-Guide". A great read, costing only 4€ and well worth it in my opinion!

Red Chair on Stone Patio, XF 16-55/2.8 WR @16mm, X-T2, CO 10 with modified BW-15 Style

Using Thomas´ settings for 24mp RAF files in Capture One 10 as a starting point I modified Capture One´s BW-15 (grain) Style by reducing grain level to 60 and optimizing sharpening and noise reduction settings slightly (of course you can also use your own favorite settings). The trick is to select an image, apply the style, adjust the various settings to your satisfaction and save it all as a new Style (take care to deselect those items which are image dependent):

Deselect presets which are image dependent!

This ensures the same film simulation, gradation (tonality curve) and grain are saved in your new Style but image specific parameters, like exposure, contrast, etc. are not affected!

Apply saved Style & auto adjust on import!

Then select your new Style and "auto adjust" in the import menu. This makes Capture One apply your Style and auto adjusts exposure parameters automatically during import, resulting in 90% ready images, which only need minor final tweaking (if at all)

View from Villa Sermolli over Buggiano in Tuscany, Italy, X-T2 with XF 16-55/2.8 WR @23mm

Summarizing, Fuji JPEG´s are good but RAW files just have that extra flexibility: If you want to get the best outta your images you gotta go RAW, allowing you eg. to change color sensitivity (like applying color filters during post processing) and offering that extra bit of highlight headroom. Looking forward to your comments, questions, and critique, thanks so much for looking by,

Best regards,

Hendrik

I hope this post was helpful / interesting for you - If you like you can support me by sending me a small donation via PayPal.me/hendriximages ! Helps me run this site & keeps the information coming, many thanks in advance!

Three Intuitive Features that will make your Fuji X-T2 "Disappear" !

At the end it´s the images that matter. The camera´s just a tool, a means to an end, a vehicle to manifest and visualize your perceptions, impressions and emotions of the wonderful world around you! The less that camera gets in your way, the more intuitive / less intrusive its operation, the better your images will be! Fuji´s X-T2 has 3 distinct, unique features that help it to come closer to this ideal than any other camera I´ve experienced so far! You want to discover how to set up your X-T2 to make it magically "disappear" and enable you to fully focus on your images? Please read on, and as a bonus I show y´all a cool trick below not yet seen elsewhere on the web … ;-)

Shadows on the street, Fuji X-T2, with XF 18-135 mm WR at 18 mm - f5.6 - 1/950 sec - ISO 400

Above image with contrasty shadows painted on the pavement is easily overseen when using an optical viewfinder ...

The Fuji X-T2 has 3 distinct, unique features enabling an intuitive, non intrusive work-flow:
1. World´s best EVF (Electronic View Finder)
2. Only camera with always visible exposure triangle settings (physical dials iso menus)
3. No interruption of viewing when changing settings (how to configure the user interface)

These play a key role in the 2 criteria responsible for getting those special images (or should I say helping those special images find you):

  • Being able to accurately pre-visualize your image, so you can be sure it tells the story you experienced or imagined when seeing the scene
  • Being able to effortlessly and intuitively adjust the settings to suit your perception w/o needing to take the camera from your eye

Below these important 3 features are discussed in more detail:

1. World´s best EVF (Electronic View Finder):

The main advantage of an EVF over any optical viewfinder (as found in DSLR´s or rangefinder type cameras) is a realistic WYSIWYG (what-you-see-is-what-you-get) view: Means you can pre-view the image exactly as it will be saved, i.e. incl. film simulation, color, white balance, exposure, contrast, etc. settings applied. In the film era you only saw the result after getting back the developed film (meaning a delay until being able to review your images and then often having no way to redo anything in case something didn’t turn out as expected). This pre-visualization feature of an EVF dramatically shortens the learning loop (scene impression > viewfinder preview > image capture > image development > final image review > optimization), thereby exponentially increasing the hit-rate of your photographic process!

10 steps to heaven ... X-Pro2 with XF 35 mm / f1.4 at f5.6 - 1/340 sec - ISO 400 (-2 EV)

So what´s so special about the X-T2´s EVF? While sporting a best in class magnification of 0,77X and a state-of-the-art 2,36M-dot resolution (like X-T1), the X-T2´s EVF has a significantly higher refresh rate (100 fps in boost mode) and half the view finder black-out time (5 ms), compared to the X-T1. Compared to the X-Pro2 it has an increased viewing angle (38° vs 29°) and a longer eye point distance (23 mm vs. 16 mm) which significantly improve view-ability and ease of viewing (especially for eyeglass wearers!)

It´s the combination of the above characteristics that enables a truly immersive and enjoyable viewing experience and animates you to use the EVF in the first place! In fact the overall improvement is now such that for the first time I prefer the X-T2´s EVF over all other options (OVF or LCD): For me the X-Pro2´s EVF now appears too small & slow, with too narrow viewing angle and the X-T1´s EVF could not really convince me at the time to go full EVF (especially in lower ambient lighting conditions), so I sold it last year …

Once actually using the EVF, turning "preview PIC effect" to ON in the menu (MENU > Wrench > Screen set-up > Preview Pic. Effect > ON) is the KEY feature allowing you to pre-visualize the image exactly as it will be taken by the camera (e.g. as a black & white image focussing on contrast, form and light / shadow distribution rather than colors)

The window wall, Fuji X-T2, with XF 18-135 mm WR at 62 mm - f8 - 1/550 sec - ISO 400

2. Only camera with always visible exposure triangle settings:

Exposure triangle means aperture, shutter speed & ISO settings - the 3 key elements determining image exposure and appearance. together with the exposure compensation dial you have 4 separate, dedicated manual dials on which you can immediately and always see/check the settings before lifting the camera to your eye, meaning you can preset the camera before taking the shot! As far as I know the Fuji X-T2 is the only one among high-end digital cameras having this traditional “photographer´s” user interface layout

On top of this Fuji´s approach to switching between program modes is much more intuitive & self-explanatory:

  • Program mode: Aperture & Shutter speed dial on "A" > all elements are set automatically, depending on lighting conditions, ISO and exposure compensation setting
  • Aperture priority mode: Aperture set on required f-stop (eg. to ensure required depth-of-field), shutter speed dial on "A" > shutter speed is automatically adjusted depending on lighting conditions, ISO and exposure compensation setting
  • Shutter priority mode: Shutter set on required shutter speed (eg. to freeze action or to synchronize with flash), aperture on "A" > aperture is automatically adjusted depending on lighting conditions, ISO and exposure compensation setting
  • Manual mode: Aperture and shutter speed set to required values (eg. for special lighting conditions / effects) > aperture and shutter speed are fixed. But with Auto-ISO you can still get a certain level of automatic exposure!

Holy windows, Fuji X-T2, with XF 35 mm / f1.4 at f5.6 - 1/480 sec - ISO 400 (-1 EV)

3. No interruption of viewing when changing settings (how to configure the user interface):

Your camera becomes an obstacle to your creative pre-visualization process and inspiration if changing settings forces you to take your eye from the viewfinder. Instead of concentrating on your subject you then need to divert your attention to fiddling with dials and menus. A camera which can be personally configured to allow changing settings without needing to remove your eye from the viewfinder will go a long way to missing fewer opportunities and allowing you to focus on what really matters: the image. In other words the camera kinda “disappears” from disturbing your work flow, see below how to do this!

I´m a “left eye dominant” shooter. When using my X-Pro2 this means my nose is squashed onto the LCD, resulting in frequently needed cleaning to remove smudges. I also gotta squint around the viewfinder to see the whole image (shorter viewfinder eye point and narrower viewing angle than X-T2). On the X-T2 my nose ends up clear to the right of the LCD but I can´t properly access the AF-L button as my nose and right thumb are competing for the limited real estate around the thumb-grip on the right hand side of the camera. Bummer, coz I love using the “back button focus” technique (means AF is initiated via a separate button rather than by half pressing the shutter release - gives me better control on what I want to focus on!

Fortunately the X-T2 offers me a work-around: By allocating “AF-ON” function to the front Fn2 function button I ca use a "front button focus" technique (long press “DISP BACK” button > Fn Button Setting menu appears > scroll down to Fn2 and right-click using 4-way controller > select “AF-ON” > confirm with “MENU OK”)

I don't (like to) use the "AF-L" button - IMO it´s misplaced coz the thumb rest partly blocks using it. Luckily this button can also be re-assigned on the X-T2, so I allocated the "Flash Function Setting" to it (use that sometimes for fill flash) and the "Shutter Type" selection to the somewhat difficult to reach Fn1 button. Pressing it cycles thru the shutter types MS > M+E > ES (which I mostly use to keep the camera quiet)

There´s more, you won´t find this nowhere else on the web: A special "Hendrix" X-T2 Fn-button configuration which allows me to fully focus on my image in the viewfinder, see the Fn-Button Settings in the image on the right:

The trick is to place the functions most used during viewing on the Fn3 and Fn6 buttons to get a fluid settings adjustment workflow in combination with the 4-way controller!

xt2 af mode.jpg

The Fn3 and Fn6 buttons are the top and bottom buttons on the 4-way controller. So, when activating the functions allocated to them you can fluidly change their function setting by continuing to press the same bottom or top button on the 4-way controller without needing to change finger position or taking your eye from the viewfinder ... COOL!

No confirmation via the "MENU OK" button is needed, half pressing the shutter release is enough. This "trick" only works for the top and bottom 4-way controller buttons. For functions allocated to the left and right buttons you need to change your finger position to the top or bottom 4-way controller button to scroll thru the function settings. This does cause some disruption of the viewing experience and may distract your attention from your image subject. Try it & you´ll immediately experience how much more fluid changing settings can be!

Holy windows, Fuji X-T2, with XF 35 mm / f1.4 at f5.6 - 1/480 sec - ISO 400

A final tip: If you want relatively fast access to 2 more secondary functions (over the 8 already assigned to Fn-buttons), you can allocate them to the top/left slot on "Q-Menu" and the 1st slot on "My Menu". These slots are faster to access as they are automatically highlighted first when selecting the Q- or My Menu. This saves some valuable time due to not needing to scroll around

I´ve allocated the top/left slot on the "Q-Menu" to the "Select Custom Setting" function (which I use to select different film simulation / setting configurations) and the 1st. slot of the "My Menu" to the "AF-C Custom Settings" function (which I use to switch between AF-C configurations depending on subject movement type)

For me it was important to get the configuration of the camera right from the start, and NOT CHANGE it afterwards, so that I could develop a consistent muscle memory fitting that configuration

With this review I´d like to encourage y´all to experiment to find the best settings for your kind of photography and work-flow, my preferred set-up is not necessarily applicable for everyone!

Many thanks for looking by & look forward to hearing your comments & experiences,

Best regards

Hendrik

I hope you enjoyed reading this post - If you like you can support me by sending me a small donation via PayPal.me/hendriximages ! Helps me run this site & keeps the information coming, many thanks in advance !